Image Processing and Feature extraction Using Python
No doubt, the above picture looks like one of the in-built desktop backgrounds. All credits to my sister, who clicks weird things which somehow become really tempting to eyes. However, we have been born in an era of digital photography, we rarely wonder how are these pictures stored in memory or how are the various transformations made in a photograph.
In this article, I will take you through some of the basic features of image processing. The ultimate goal of this data massaging remains the same : feature extraction. But here we need more intensive data cleaning. But data cleaning is done on datasets , tables , text etc. How is this done on an image? We will look at how an image is stored on a disc and how we can manipulate an image using this underlying data?
Importing an Image
Importing an image in python is easy. Following code will help you import an image on Python :

Understanding the underlying data
This image has several colors and many pixels. To visualize how this image is stored, think of every pixel as a cell in matrix. Now this cell contains three different intensity information, catering to the color Red, Green and Blue. So a RGB image becomes a 3-D matrix. Each number is the intensity of Red, Blue and Green colors.
Let’s look at a few transformations:
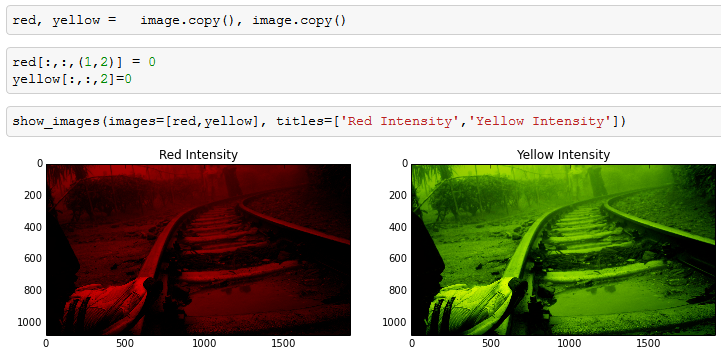
As you can see in the above image, we manipulated the third dimension and got the transformation done. Yellow is not a direct color available in our dictionary but comes out as combination of red and green. We got the transformation done by setting up intensity of other colors as zero.
Converting Images to a 2-D matrix
Handling the third dimension of images sometimes can be complex and redundant. In feature extraction, it becomes much simpler if we compress the image to a 2-D matrix. This is done by Gray-scaling or Binarizing. Gray scaling is richer than Binarizing as it shows the image as a combination of different intensities of Gray. Whereas binarzing simply builds a matrix full of 0s and 1s.
Here is how you convert a RGB image to Gray scale:
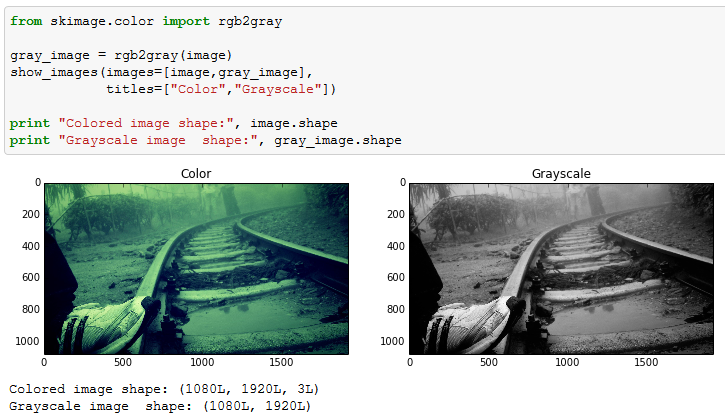
As you can see, the dimension of the image has been reduced to two in Grayscale. However, the features are equally visible in the two images. This is the reason why Grayscale takes much lesser space when stored on Disc.
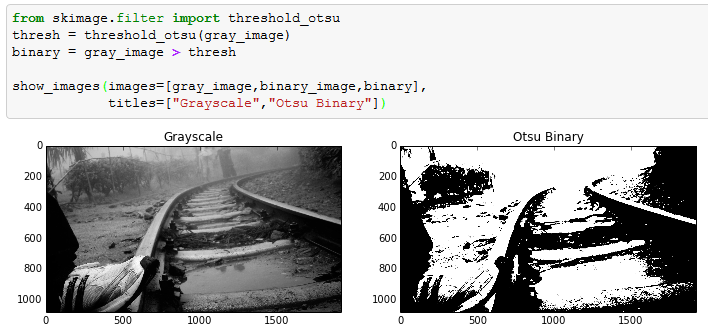
Now let’s try to binarize this Grayscale image. This is done by finding a threshold and flagging the pixels of Grayscale. In this article I have used Otsu’s method to find the threshold. Otsu’s method calculates an “optimal” threshold by maximizing the variance between two classes of pixels, which are separated by the threshold. Equivalently, this threshold minimizes the intra-class variance.
Following is a code to do this transformation:
Blurring an Image
Last part we will cover in this article is more relevant for feature extraction : Blurring of images. Grayscale or binary image sometime captures more than required image and blurring comes very handy in such scenarios. For instance, in this image if the shoe was of lesser interest than the railway track, blurring would have added a lot of value. This will become clear from this example. Blurring algorithm takes weighted average of neighbouring pixels to incorporate surroundings color into every pixel. Following is an example of blurring :

In the above picture, after blurring we clearly see that the shoe has now gone to the same intensity level as that of rail track. Hence, this technique comes in very handy in many scenarios of image processing.


Comments
Post a Comment
Please Share Your Views