SSO — WSO2 API Manager and Keycloak Identity Manager
In this article, we are going to see how to implement Single Sign-On (SSO) for WSO2 API Manager using Keycloak as a Federated Identity Provider. Also, we'll choose a deep-dive showing how debugging works with the WSO2 API Manager code to see what happens inside when it's configured with a third-party identity provider (i.e Keycloak in this example).
High-Level Architecture
This is what we are going to do in this tutorial.
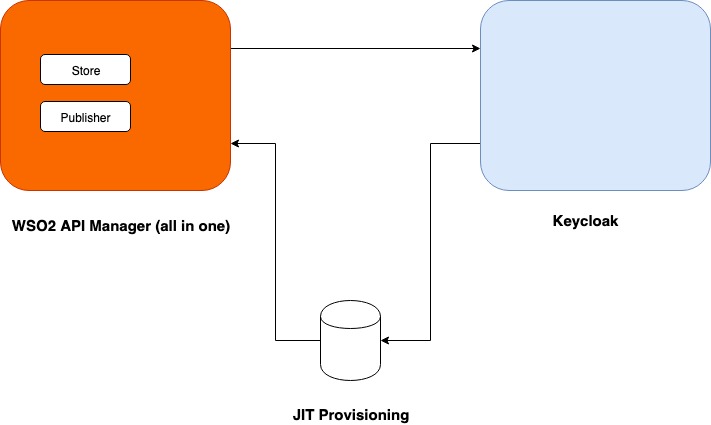
High-level architecture
Software Needed
Following softwares will be needed:
WSO2 API Manager (2.6.0)
Keycloak (6.0.1)
Note: We aren’t getting to use WSO2 Identity Server as a middleman for this
tutorial. The article is predicated on pure WSO2 API Manager 2.6.0 (all in
one).
Before We Start
The tutorial will be divided into two parts. In the first part, I will explain how to install and configure Keycloak. In the second part, we will see how to install and configure the WSO2 API Manager.
Before we start, let's modify the /etc/hosts file and add two hosts.
# APIM Test
127.0.0.1 apim.wso2.com
# Keycloak
127.0.0.1 idp.keycloak.com
Keycloak Installation and Configuration
Installation
The installation of the Keycloak is sort of straightforward. Download the zip version of Keycloak (6.0.1) and unzip it in your preferred directory.
Keystore Creation
Now we'd like to make a Keystore
with the hostname we created for the Keycloak. Browse to the subsequent
location.
$
keycloak-6.0.1/standalone/configuration
There, you'll see an existing
application.keystore. Delete it and make a replacement one. Follow the steps
below.
$ keytool -genkey -alias server
-keyalg RSA -keysize 2048 -validity 3650 -keystore application.keystore -dname
"CN=*.keycloak.com" -storepass password -keypass password -noprompt
Export the general public
certificate from the Keystore.
$ keytool -export -alias server
-file server.crt -keystore application.keystore -storepass password -noprompt
We are getting to import this
server.crt within the client-truststore.jks of the WSO2 API Manager later.
Execution
Browse to the bin directory and
execute the subsequent command.
$ sh standalone.sh
When executed, as shown above,
it'll use its default ports (e.g 8080, 8443). If you would like to vary the
default ports, use the port offset as shown below.
$ sh standalone.sh
-Djboss.socket.binding.port-offset=1
The ports are going to be shifted
to 8081, 8444, etc. Once the server is up and running, access this URL.
Note: this is often the primary
time it'll ask you to make an admin user. For this tutorial, I even have
created the user admin with password admin.
Client Configuration
Once logged in with the admin user created within the previous step you'll see a page like this. We are getting to use the default master realm for this tutorial, but, be happy to make your own custom realm.
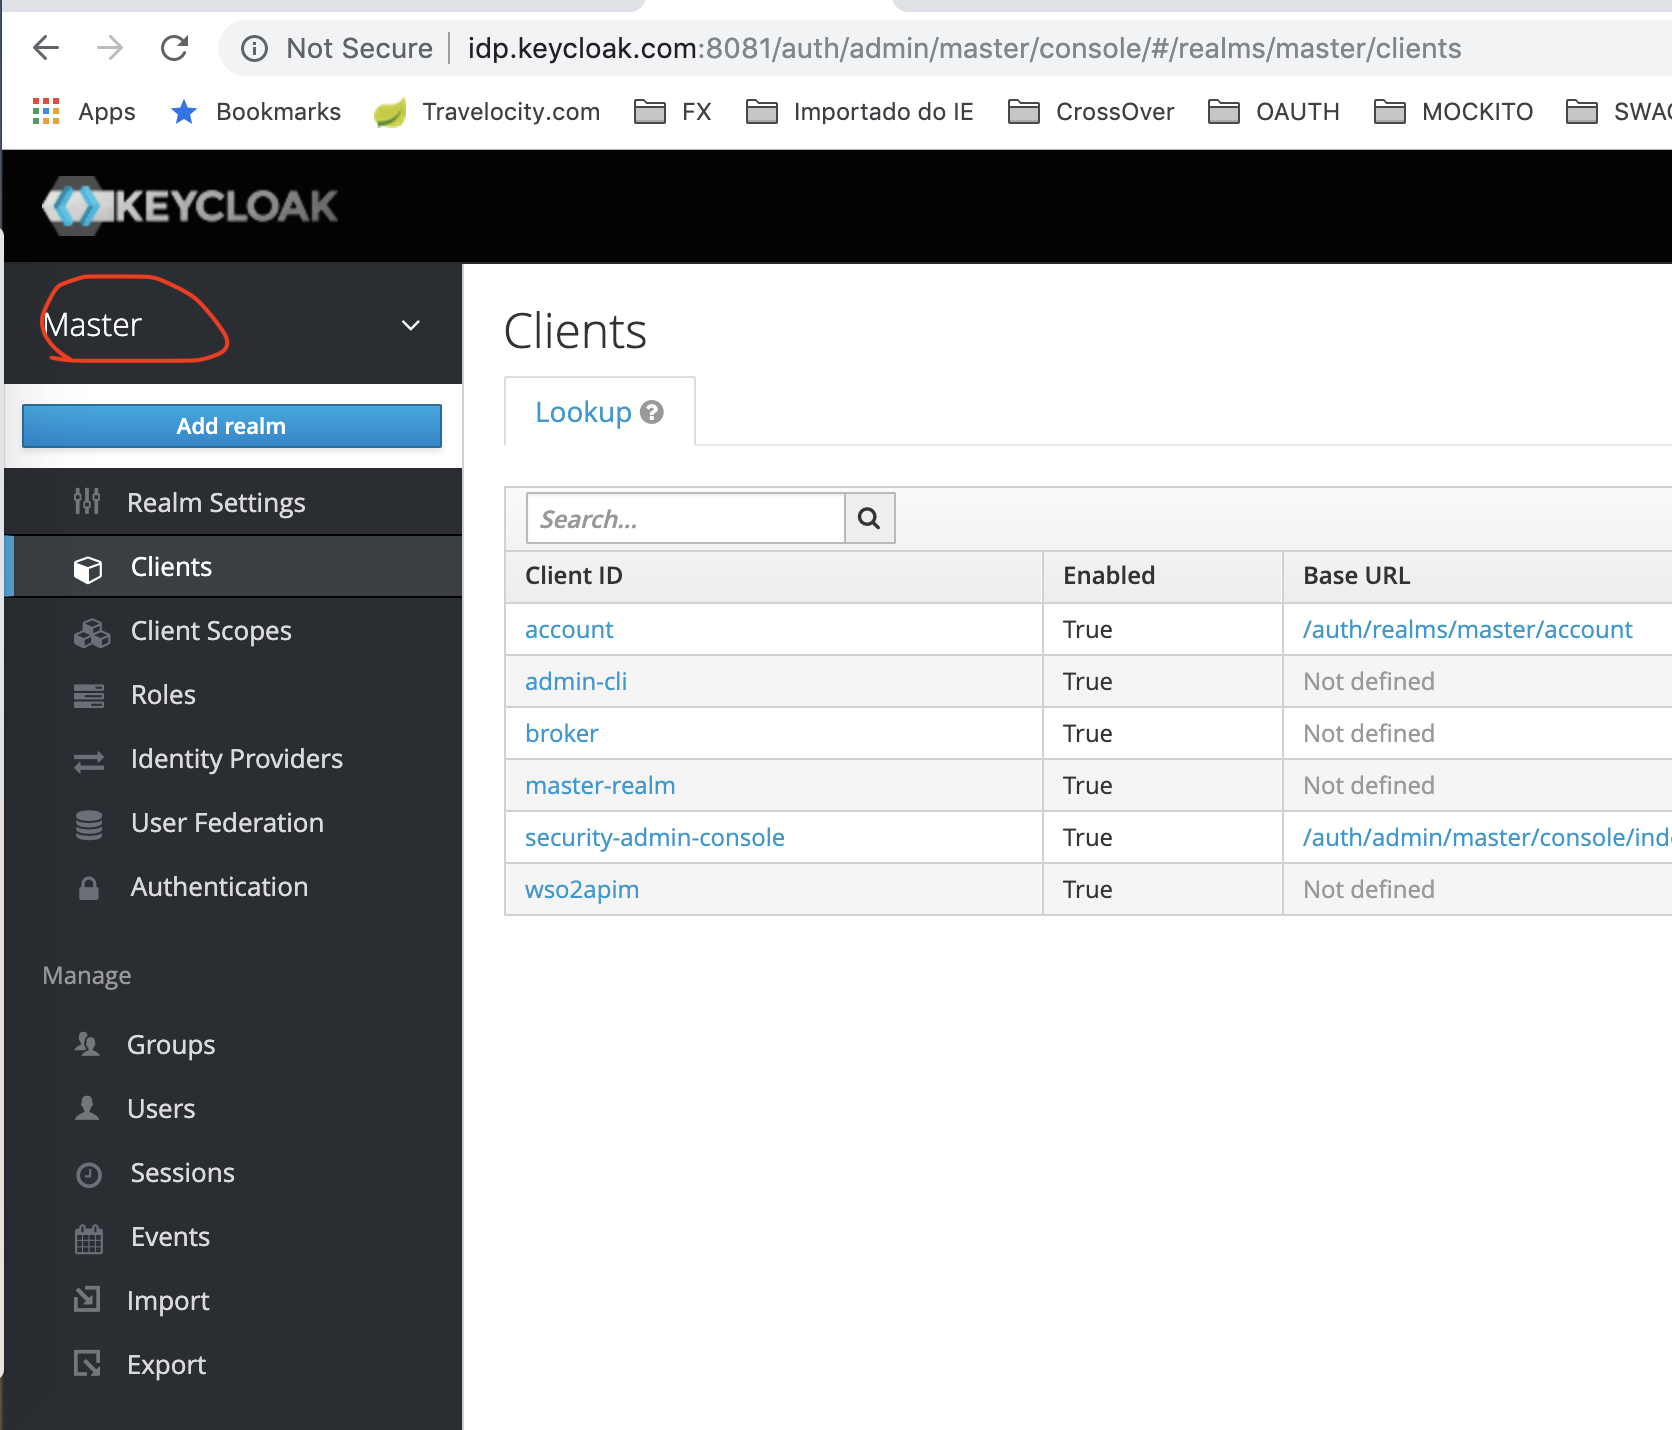
Master realm
After that now create an OpenID-connect client as shown in the below screen-shot.
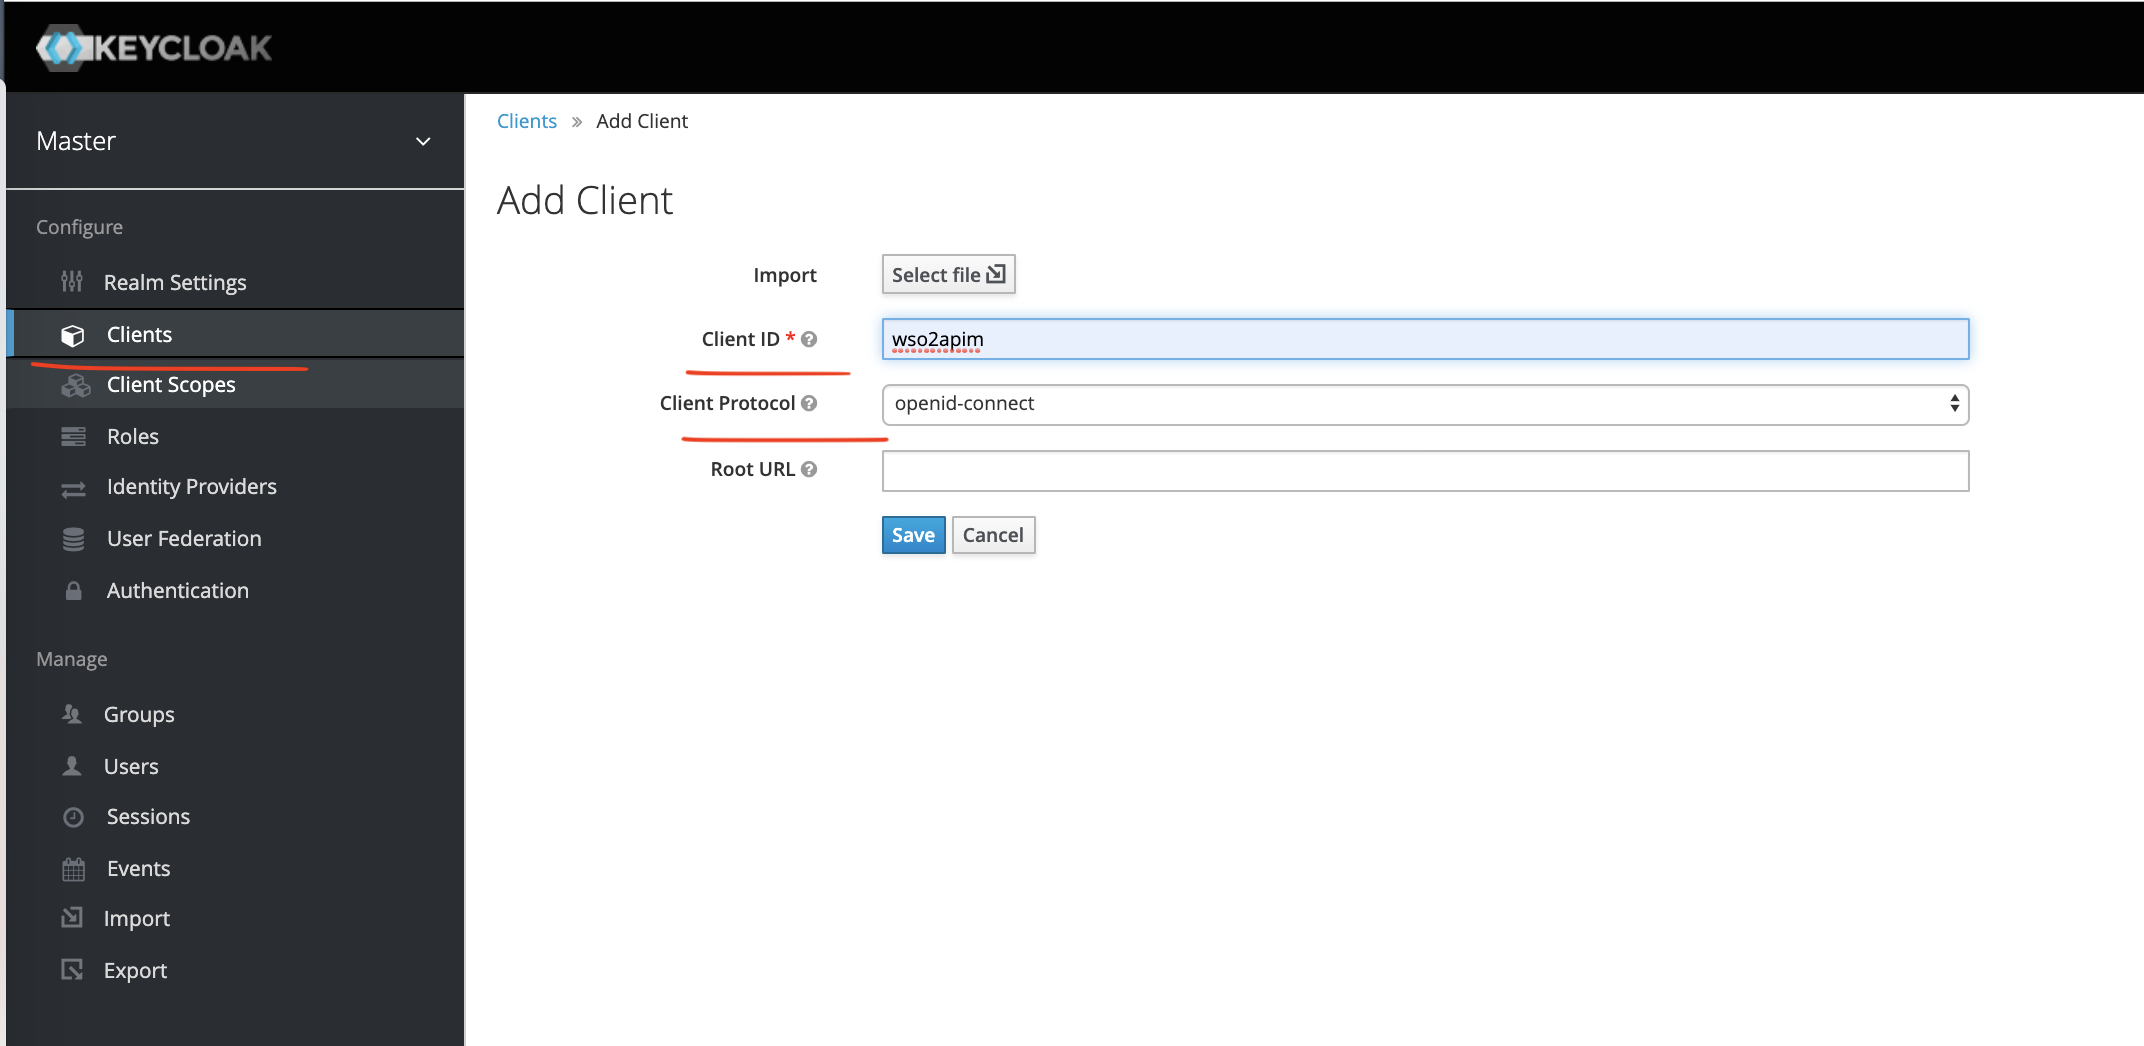
OpenID-connect client
After creating the client it's time to configure it as shown below.
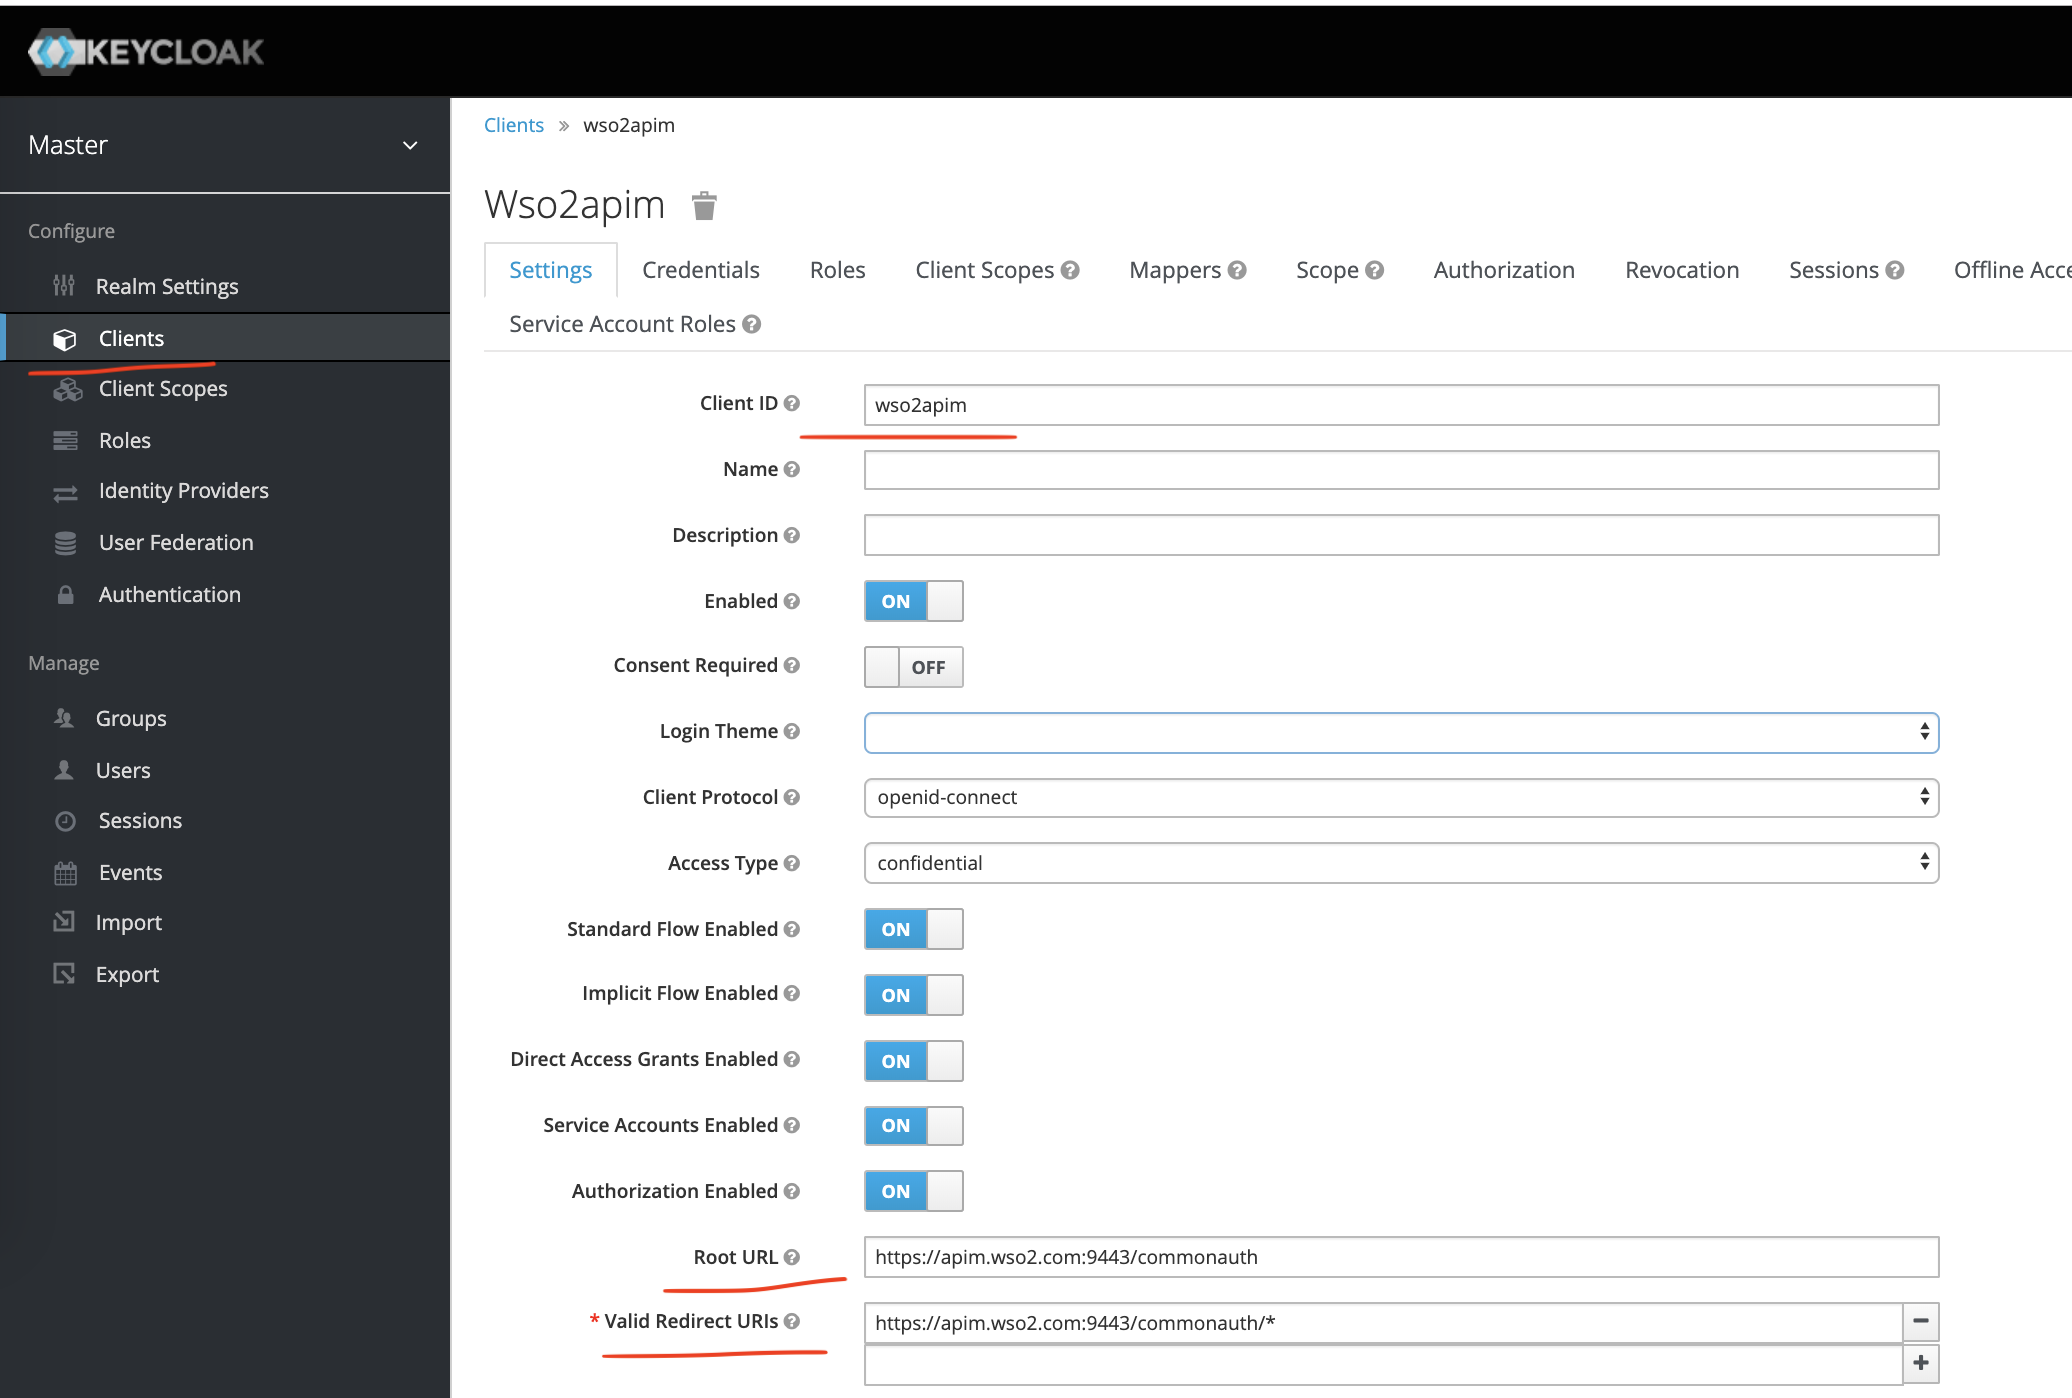
Configuring client
Now go to the Credentials tab and you can see the client-secret.
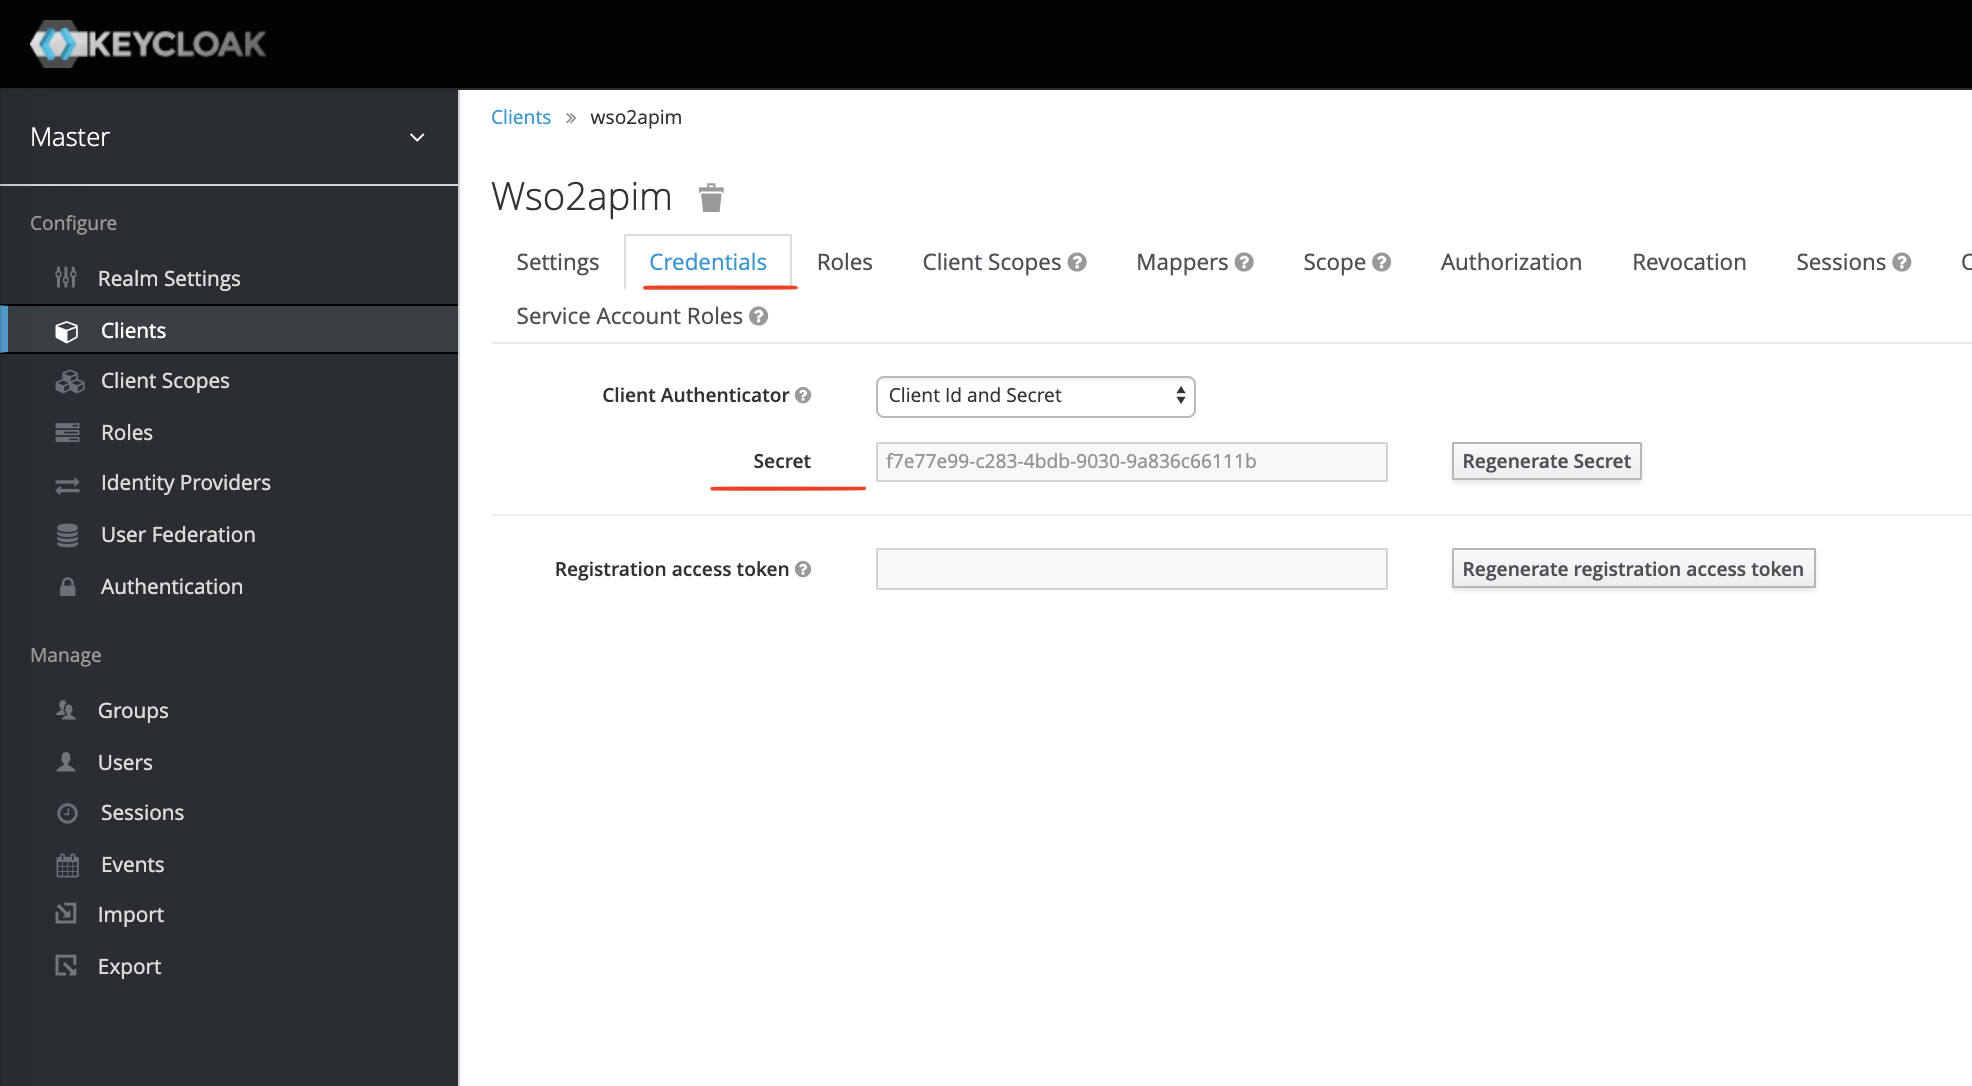
Checking credentials
At this point, we have configured our openid-connect client named wso2apim.
Let's Play
Let's check on what we've configured. Execute the subsequent URL.
It will return you all the required URLs (as shown below) we'll need later for configuring a Federated IDP in WSO2 API Manager.
{
"issuer": "http://idp.keycloak.com:8081/auth/realms/master",
"authorization_endpoint": "http://idp.keycloak.com:8081/auth/realms/master/protocol/openid-connect/auth",
"token_endpoint": "http://idp.keycloak.com:8081/auth/realms/master/protocol/openid-connect/token",
"token_introspection_endpoint": "http://idp.keycloak.com:8081/auth/realms/master/protocol/openid-connect/token/introspect",
"userinfo_endpoint": "http://idp.keycloak.com:8081/auth/realms/master/protocol/openid-connect/userinfo",
"end_session_endpoint": "http://idp.keycloak.com:8081/auth/realms/master/protocol/openid-connect/logout",
"jwks_uri": "http://idp.keycloak.com:8081/auth/realms/master/protocol/openid-connect/certs",
"check_session_iframe": "http://idp.keycloak.com:8081/auth/realms/master/protocol/openid-connect/login-status-iframe.html",
"grant_types_supported": [
"authorization_code",
"implicit",
"refresh_token",
"password",
"client_credentials"
],
"response_types_supported": [
"code",
"none",
"id_token",
"token",
"id_token token",
"code id_token",
"code token",
"code id_token token"
],
"subject_types_supported": [
"public",
"pairwise"
],
"id_token_signing_alg_values_supported": [
"PS384",
"ES384",
"RS384",
"HS256",
"HS512",
"ES256",
"RS256",
"HS384",
"ES512",
"PS256",
"PS512",
"RS512"
],
"userinfo_signing_alg_values_supported": [
"PS384",
"ES384",
"RS384",
"HS256",
"HS512",
"ES256",
"RS256",
"HS384",
"ES512",
"PS256",
"PS512",
"RS512",
"none"
],
"request_object_signing_alg_values_supported": [
"PS384",
"ES384",
"RS384",
"ES256",
"RS256",
"ES512",
"PS256",
"PS512",
"RS512",
"none"
],
"response_modes_supported": [
"query",
"fragment",
"form_post"
],
"registration_endpoint": "http://idp.keycloak.com:8081/auth/realms/master/clients-registrations/openid-connect",
"token_endpoint_auth_methods_supported": [
"private_key_jwt",
"client_secret_basic",
"client_secret_post",
"client_secret_jwt"
],
"token_endpoint_auth_signing_alg_values_supported": [
"RS256"
],
"claims_supported": [
"aud",
"sub",
"iss",
"auth_time",
"name",
"given_name",
"family_name",
"preferred_username",
"email"
],
"claim_types_supported": [
"normal"
],
"claims_parameter_supported": false,
"scopes_supported": [
"openid",
"address",
"email",
"microprofile-jwt",
"offline_access",
"phone",
"profile",
"roles",
"web-origins"
],
"request_parameter_supported": true,
"request_uri_parameter_supported": true,
"code_challenge_methods_supported": [
"plain",
"S256"
],
"tls_client_certificate_bound_access_tokens": true,
"introspection_endpoint": "http://idp.keycloak.com:8081/auth/realms/master/protocol/openid-connect/token/introspect"
}
Pretty cool! Now, let's check the claims of the admin user when called through a /token URL. Here is the CURL command for it.
$ curl -k -X POST \
https://idp.keycloak.com:8444/auth/realms/master/protocol/openid-connect/token \
-H 'Content-Type: application/x-www-form-urlencoded' \
-H 'cache-control: no-cache' \
-d 'username=admin&password=admin&grant_type=password&client_id=wso2apim&client_secret=f7e77e99-c283-4bdb-9030-9a836c66111b'
Important parameters:
usernameadminpasswordadmingrant_typepasswordclient_idwso2apimclient_secretThe secret we saw in the Credentials tab of the client wso2apim.
The response will be something like this:
{
"access_token": "eyJhbGciOiJSUzI1NiIsInR5cCIgOiAiSldUIiwia2lkIiA6ICJ5cXlsRWwwcndLajR0Mm1vR3JwdG5lVHNPS3VWd05VbWw0NWc2Yms3LXFBIn0.eyJqdGkiOiI4MmZiZjc5NS0yYmQ0LTQ4NDYtOGJlMS1lZGE1NWVmOWM3NWYiLCJleHAiOjE1NjQ5Mjk1OTcsIm5iZiI6MCwiaWF0IjoxNTY0OTI5NTM3LCJpc3MiOiJodHRwczovL2lkcC5rZXljbG9hay5jb206ODQ0NC9hdXRoL3JlYWxtcy9tYXN0ZXIiLCJhdWQiOlsibWFzdGVyLXJlYWxtIiwiYWNjb3VudCJdLCJzdWIiOiI0ODIyODJhNS00NjdmLTQ3OWUtOWQ0MC1jMGZhZGJjYjM2YmYiLCJ0eXAiOiJCZWFyZXIiLCJhenAiOiJ3c28yYXBpbSIsImF1dGhfdGltZSI6MCwic2Vzc2lvbl9zdGF0ZSI6ImNhN2U3YjY1LTYyMmMtNGJjNC04MGRiLTM0MTYxNDEyZTBiNiIsImFjciI6IjEiLCJyZWFsbV9hY2Nlc3MiOnsicm9sZXMiOlsiY3JlYXRlLXJlYWxtIiwib2ZmbGluZV9hY2Nlc3MiLCJhZG1pbiIsInVtYV9hdXRob3JpemF0aW9uIl19LCJyZXNvdXJjZV9hY2Nlc3MiOnsibWFzdGVyLXJlYWxtIjp7InJvbGVzIjpbInZpZXctcmVhbG0iLCJ2aWV3LWlkZW50aXR5LXByb3ZpZGVycyIsIm1hbmFnZS1pZGVudGl0eS1wcm92aWRlcnMiLCJpbXBlcnNvbmF0aW9uIiwiY3JlYXRlLWNsaWVudCIsIm1hbmFnZS11c2VycyIsInF1ZXJ5LXJlYWxtcyIsInZpZXctYXV0aG9yaXphdGlvbiIsInF1ZXJ5LWNsaWVudHMiLCJxdWVyeS11c2VycyIsIm1hbmFnZS1ldmVudHMiLCJtYW5hZ2UtcmVhbG0iLCJ2aWV3LWV2ZW50cyIsInZpZXctdXNlcnMiLCJ2aWV3LWNsaWVudHMiLCJtYW5hZ2UtYXV0aG9yaXphdGlvbiIsIm1hbmFnZS1jbGllbnRzIiwicXVlcnktZ3JvdXBzIl19LCJhY2NvdW50Ijp7InJvbGVzIjpbIm1hbmFnZS1hY2NvdW50IiwibWFuYWdlLWFjY291bnQtbGlua3MiLCJ2aWV3LXByb2ZpbGUiXX19LCJzY29wZSI6ImVtYWlsIHByb2ZpbGUiLCJlbWFpbF92ZXJpZmllZCI6ZmFsc2UsInByZWZlcnJlZF91c2VybmFtZSI6ImFkbWluIn0.OsEICf4ORcyryWhUSxjMLG8FpTKCYPIqn04qieoyl3FxJiN-SkHVNLQddJbgfYQ71z1LLkfQJaa4TlsrVabtqMu4Uo9ENM8qD1nh_J5DF967SEnClTfsgahojNFSamUdNJRMiSSGkCQplqdDDs1_24VNa9OL3c0R-MeNMSpsJ2JGdF1AbcoUZ5y9Fr26cEIzRKNqi4qBJvtu8v15GZF64A5efDYDAA6juEcIm32UYaXP6xgWHY0jC11CXSwK-204dUPCW6tCxcFyuBxFvLI-Y8b03XWcBPhQtJSL3DqetkAwKi2frHJxmhhxVtApDU-YHV7QOj-lgEE2S3LsLqP3FQ",
"expires_in": 60,
"refresh_expires_in": 1800,
"refresh_token": "eyJhbGciOiJIUzI1NiIsInR5cCIgOiAiSldUIiwia2lkIiA6ICJkZDEzMGE3NC1iNDA1LTQ3NjUtOTc2Ni05ZjNjYjY1ZTJiZGUifQ.eyJqdGkiOiI5ZTU5NTdlMy1mMmFhLTQxOGYtOTM0OS02YjAyOTBmMTBhZDEiLCJleHAiOjE1NjQ5MzEzMzcsIm5iZiI6MCwiaWF0IjoxNTY0OTI5NTM3LCJpc3MiOiJodHRwczovL2lkcC5rZXljbG9hay5jb206ODQ0NC9hdXRoL3JlYWxtcy9tYXN0ZXIiLCJhdWQiOiJodHRwczovL2lkcC5rZXljbG9hay5jb206ODQ0NC9hdXRoL3JlYWxtcy9tYXN0ZXIiLCJzdWIiOiI0ODIyODJhNS00NjdmLTQ3OWUtOWQ0MC1jMGZhZGJjYjM2YmYiLCJ0eXAiOiJSZWZyZXNoIiwiYXpwIjoid3NvMmFwaW0iLCJhdXRoX3RpbWUiOjAsInNlc3Npb25fc3RhdGUiOiJjYTdlN2I2NS02MjJjLTRiYzQtODBkYi0zNDE2MTQxMmUwYjYiLCJyZWFsbV9hY2Nlc3MiOnsicm9sZXMiOlsiY3JlYXRlLXJlYWxtIiwib2ZmbGluZV9hY2Nlc3MiLCJhZG1pbiIsInVtYV9hdXRob3JpemF0aW9uIl19LCJyZXNvdXJjZV9hY2Nlc3MiOnsibWFzdGVyLXJlYWxtIjp7InJvbGVzIjpbInZpZXctcmVhbG0iLCJ2aWV3LWlkZW50aXR5LXByb3ZpZGVycyIsIm1hbmFnZS1pZGVudGl0eS1wcm92aWRlcnMiLCJpbXBlcnNvbmF0aW9uIiwiY3JlYXRlLWNsaWVudCIsIm1hbmFnZS11c2VycyIsInF1ZXJ5LXJlYWxtcyIsInZpZXctYXV0aG9yaXphdGlvbiIsInF1ZXJ5LWNsaWVudHMiLCJxdWVyeS11c2VycyIsIm1hbmFnZS1ldmVudHMiLCJtYW5hZ2UtcmVhbG0iLCJ2aWV3LWV2ZW50cyIsInZpZXctdXNlcnMiLCJ2aWV3LWNsaWVudHMiLCJtYW5hZ2UtYXV0aG9yaXphdGlvbiIsIm1hbmFnZS1jbGllbnRzIiwicXVlcnktZ3JvdXBzIl19LCJhY2NvdW50Ijp7InJvbGVzIjpbIm1hbmFnZS1hY2NvdW50IiwibWFuYWdlLWFjY291bnQtbGlua3MiLCJ2aWV3LXByb2ZpbGUiXX19LCJzY29wZSI6ImVtYWlsIHByb2ZpbGUifQ.pv25UVfaDuXaQSNGmNXkdgawJ__K6RdAE4P4lrFtZ8k",
"token_type": "bearer",
"not-before-policy": 0,
"session_state": "ca7e7b65-622c-4bc4-80db-34161412e0b6",
"scope": "email profile"
}
Now, copy this access_token and go to https://jwt.io/ to decode it. You will see something like this,
{
"jti": "82fbf795-2bd4-4846-8be1-eda55ef9c75f",
"exp": 1564929597,
"nbf": 0,
"iat": 1564929537,
"iss": "https://idp.keycloak.com:8444/auth/realms/master",
"aud": [
"master-realm",
"account"
],
"sub": "482282a5-467f-479e-9d40-c0fadbcb36bf",
"typ": "Bearer",
"azp": "wso2apim",
"auth_time": 0,
"session_state": "ca7e7b65-622c-4bc4-80db-34161412e0b6",
"acr": "1",
"realm_access": {
"roles": [
"create-realm",
"offline_access",
"admin",
"uma_authorization"
]
},
"resource_access": {
"master-realm": {
"roles": [
"view-realm",
"view-identity-providers",
"manage-identity-providers",
"impersonation",
"create-client",
"manage-users",
"query-realms",
"view-authorization",
"query-clients",
"query-users",
"manage-events",
"manage-realm",
"view-events",
"view-users",
"view-clients",
"manage-authorization",
"manage-clients",
"query-groups"
]
},
"account": {
"roles": [
"manage-account",
"manage-account-links",
"view-profile"
]
}
},
"scope": "email profile",
"email_verified": false,
"preferred_username": "admin"
}
Note the sub claim. It's something autogenerated and contains special characters. At the time of JIT provisioning, WSO2 API Manager will attempt to insert it within the user database table and throw an exception because it doesn't accept special characters.
To resolve this problem, we'll got to use the Mappers facility of Keycloak as shown below.
Create a Mapper called userNameInSub (can be any name) and choose Mapper Type adequate to Script Mapper. Add the road as marked within the screen-shot below.
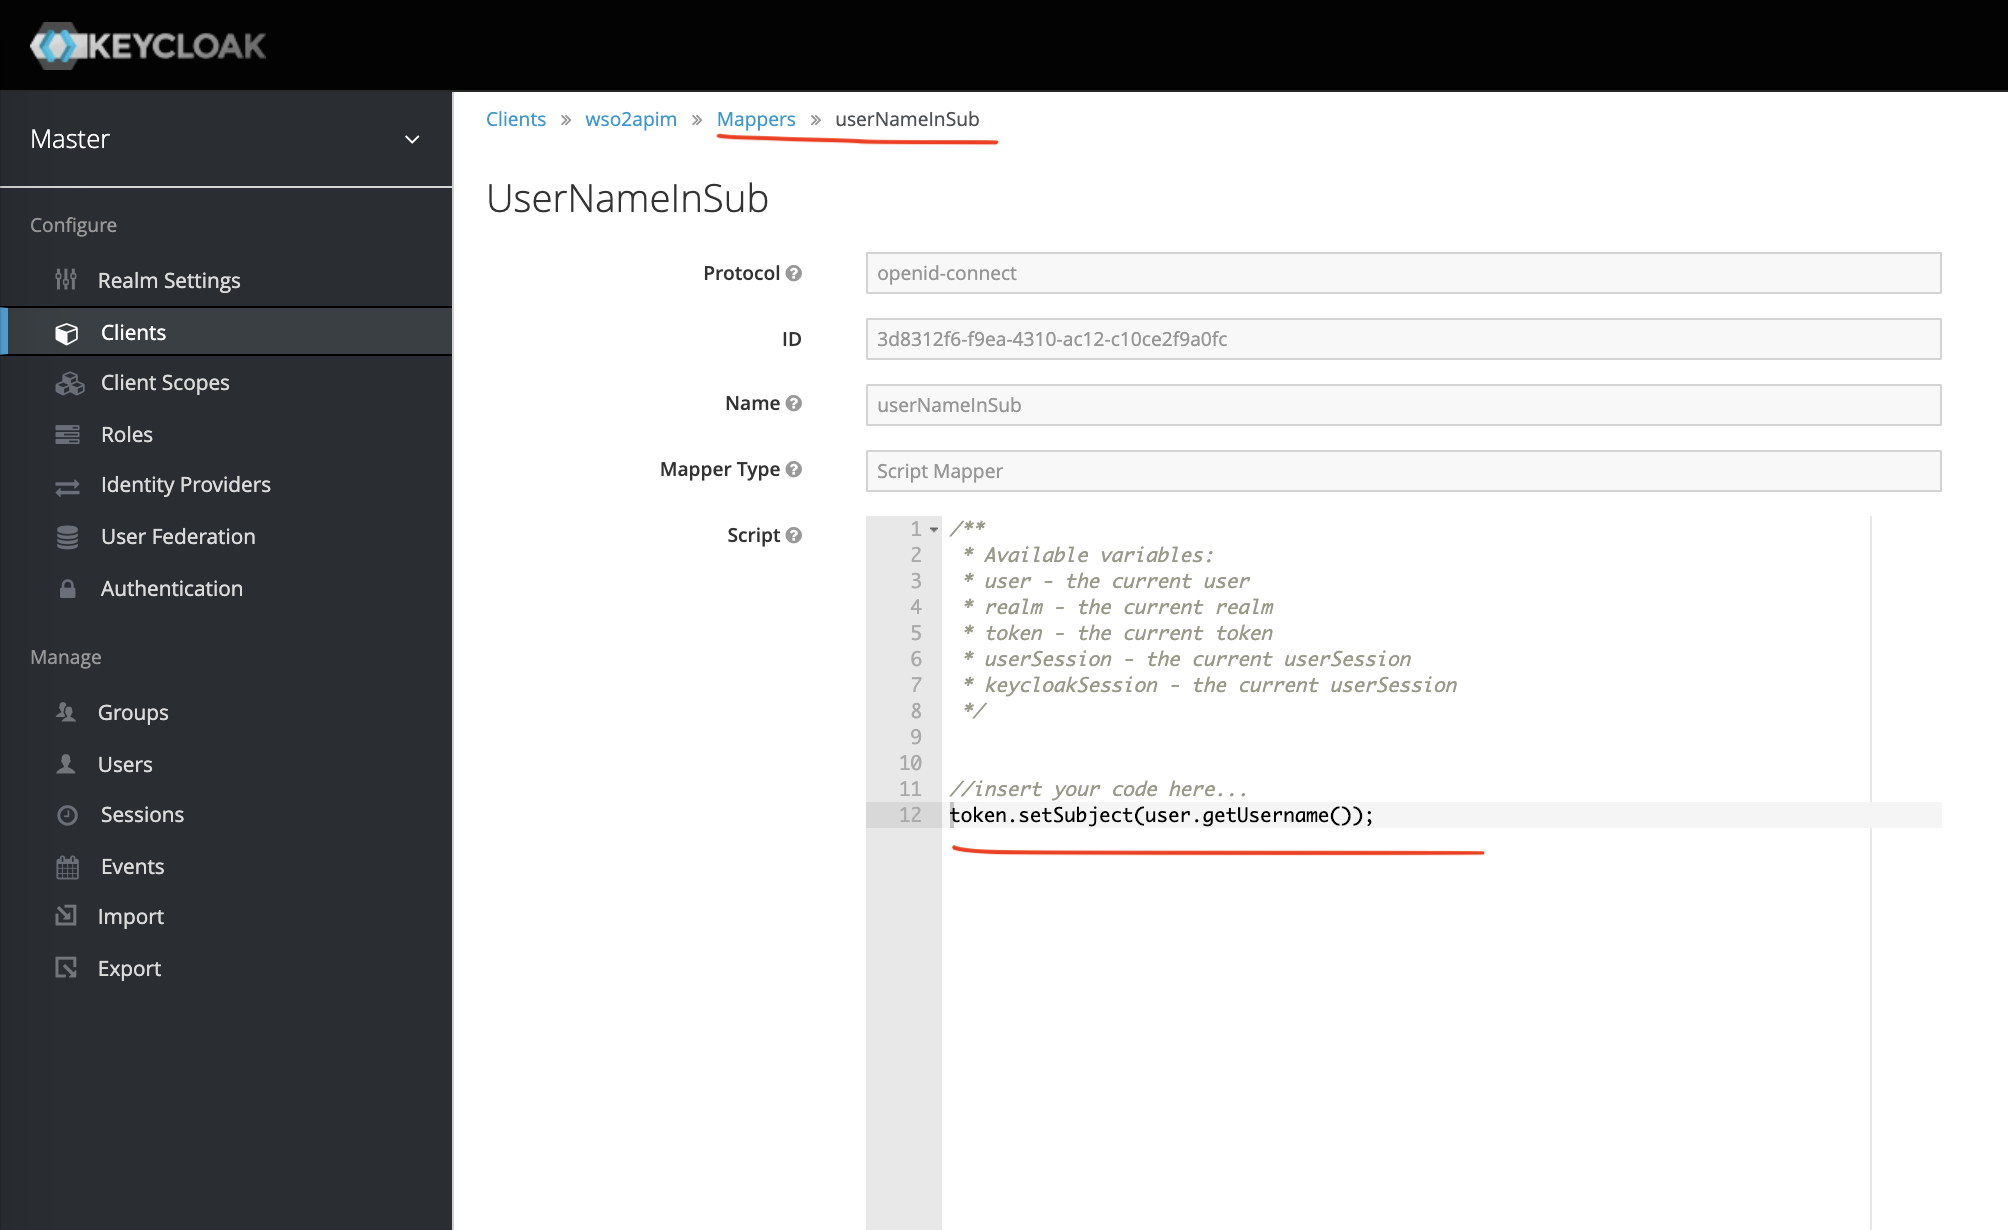
Adding userNameInSub Mapper
Let's, execute the same CURL command, and you should see admin (username) in the sub claim.
Role Creation
Let's create subscriber a role in the wso2apim client.
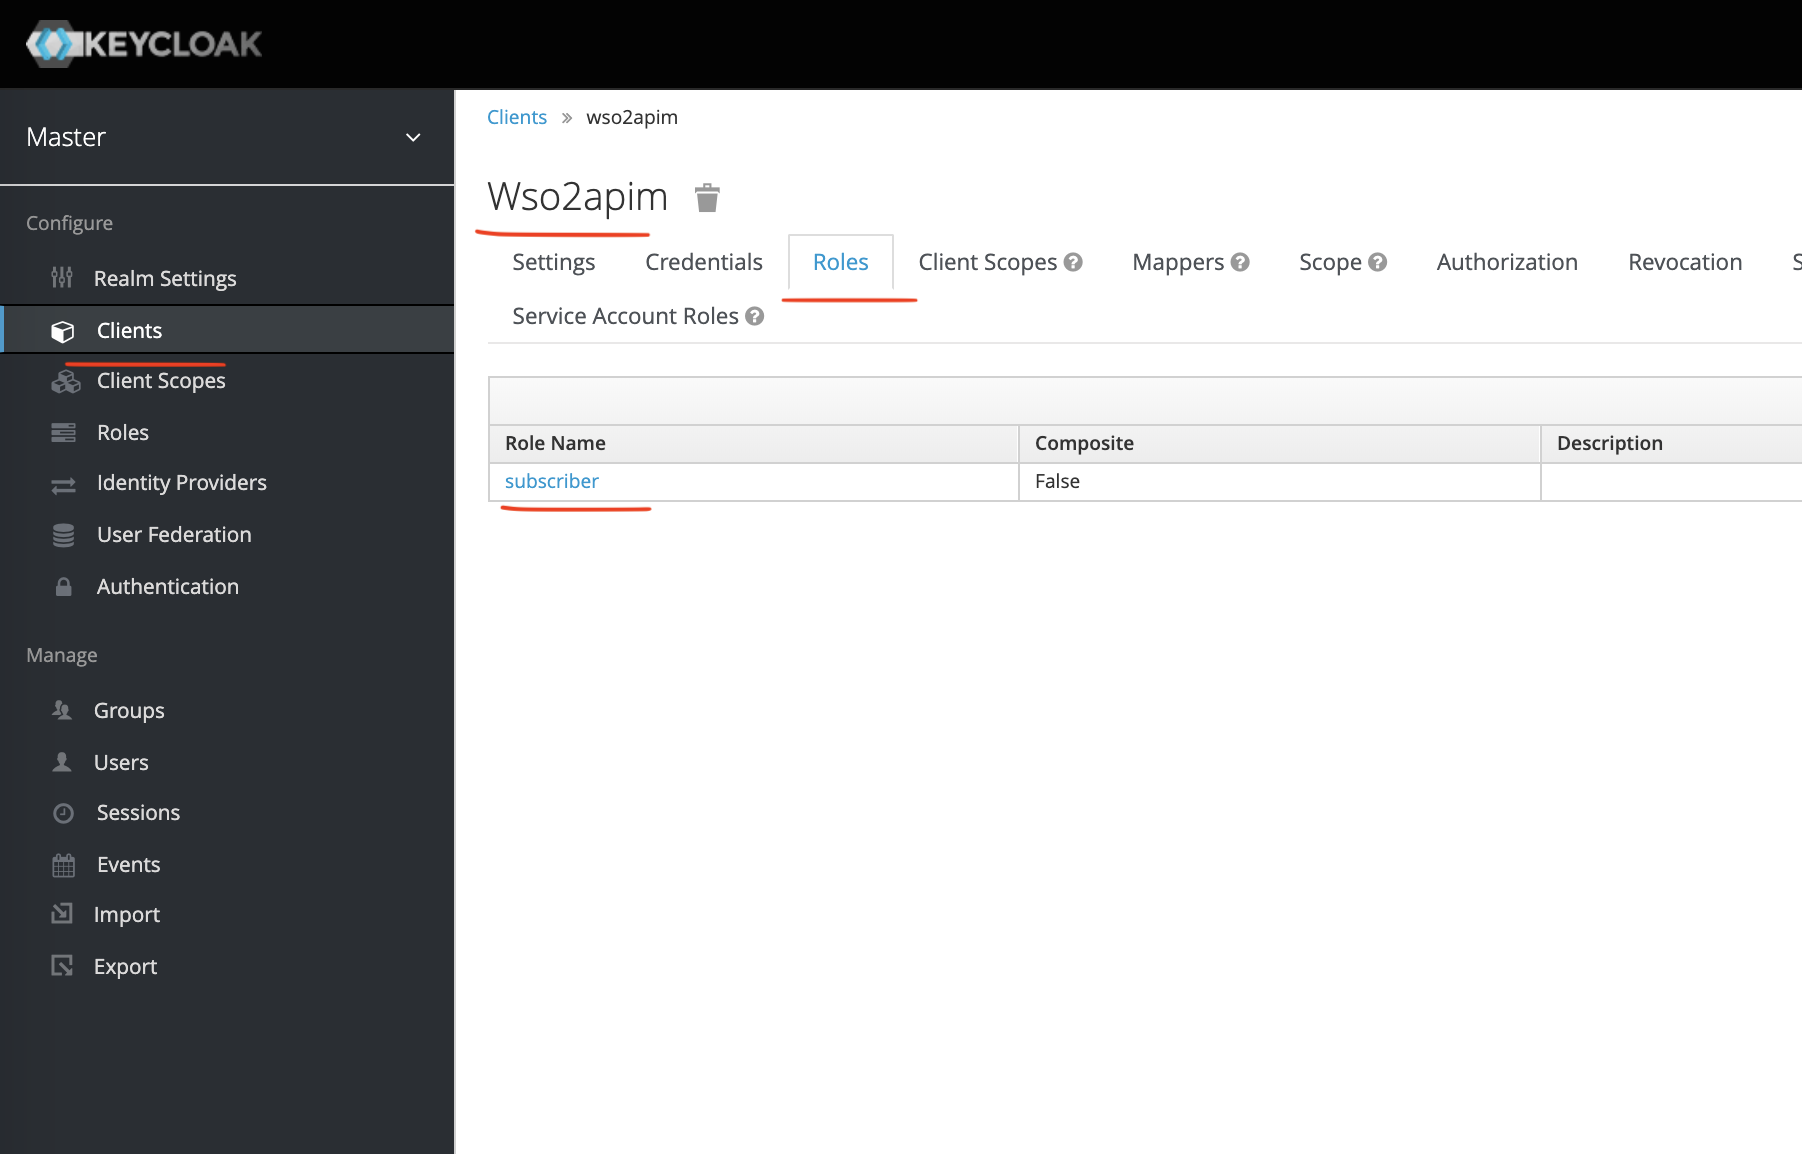
Creating subscriber in wso2apim client
Now, we will need this role claim in the access_token. For that we will create another Mapper (SubscriberRoleMapper) as shown below.
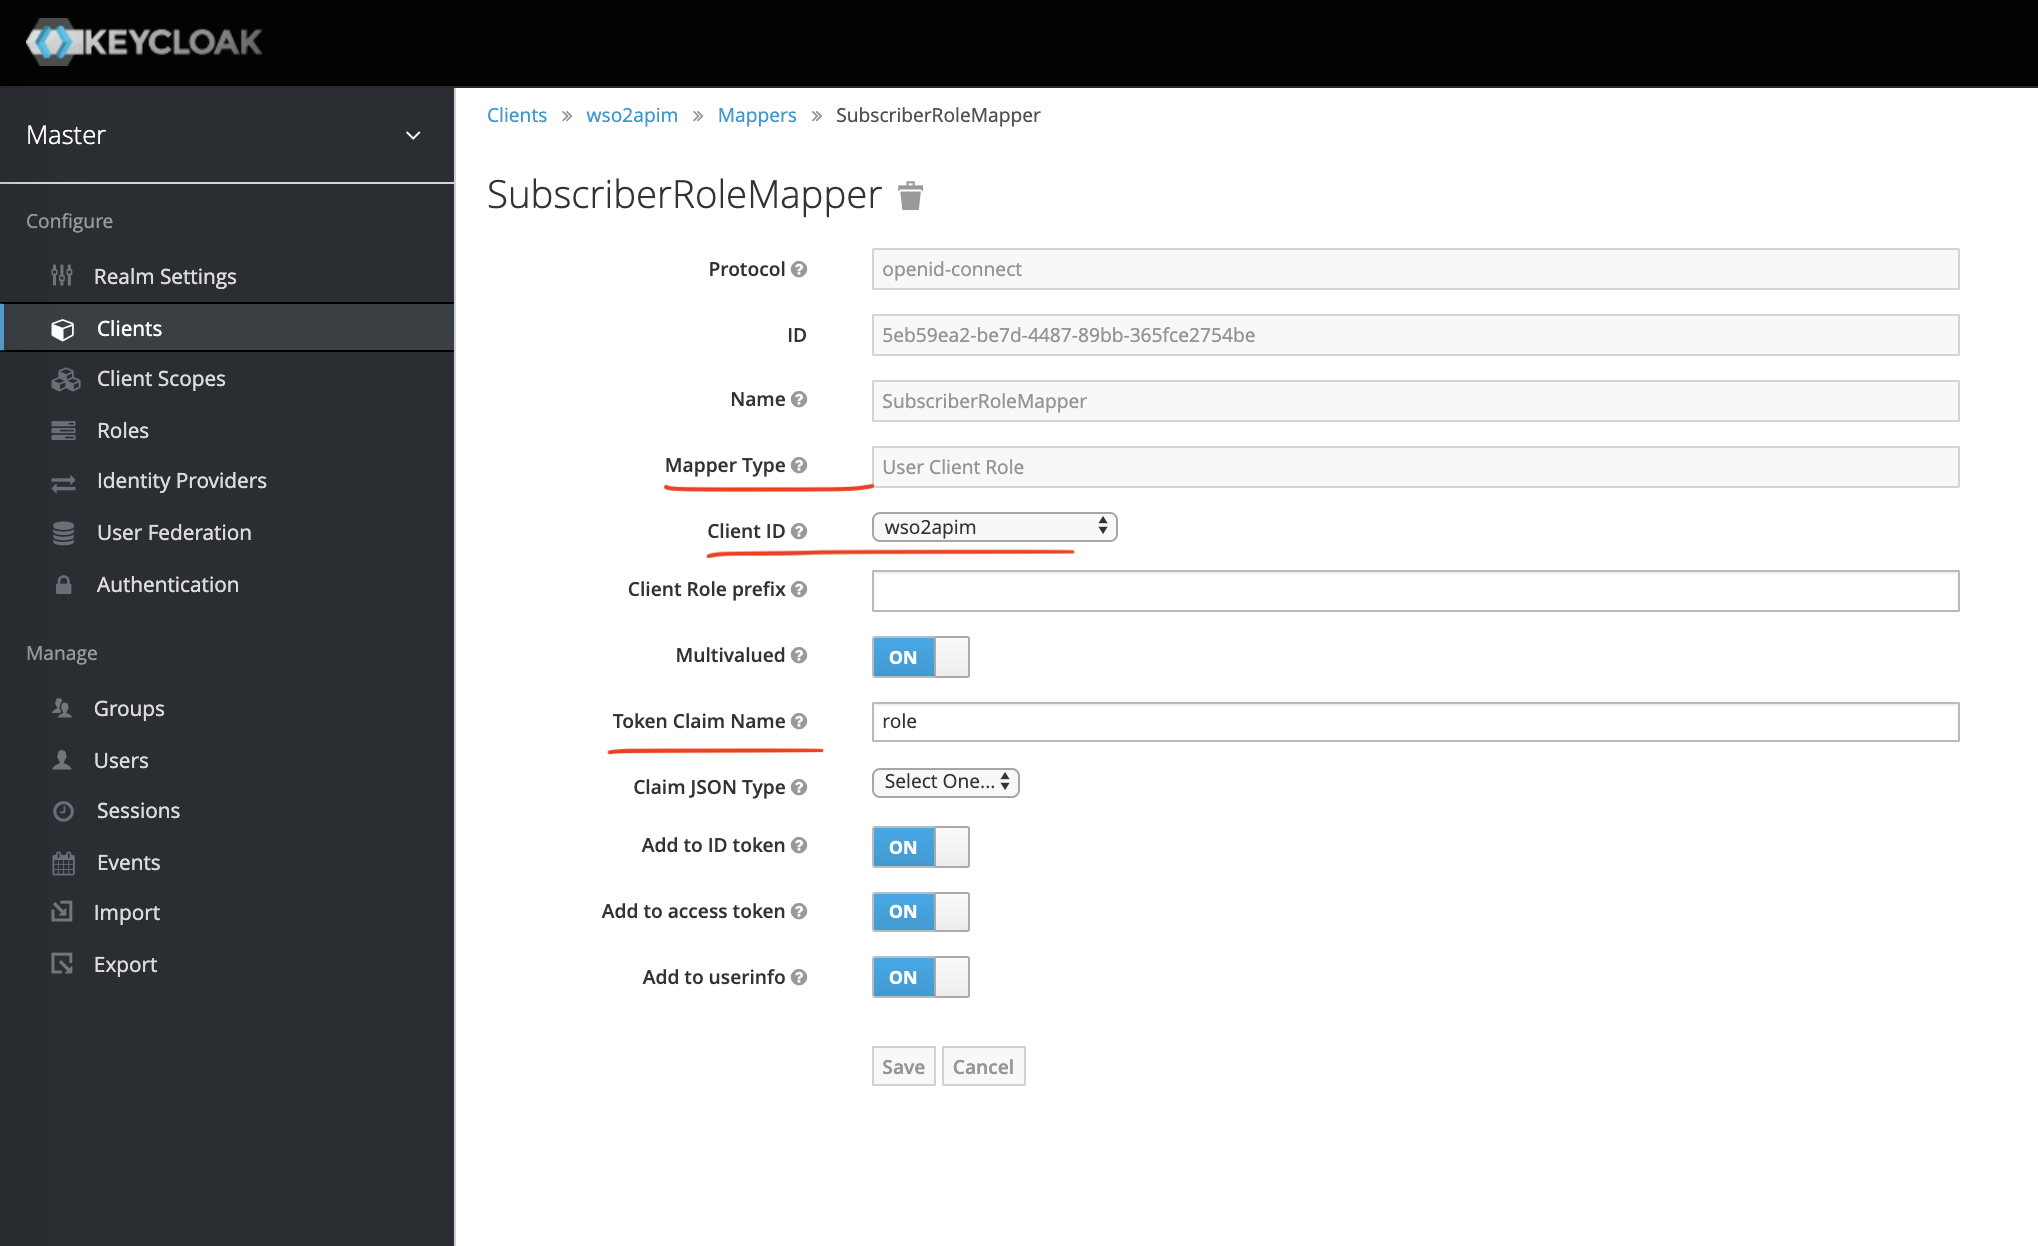
Creating SubscriberRoleMapper
Create User and Assign Role
Let's create some demo users.
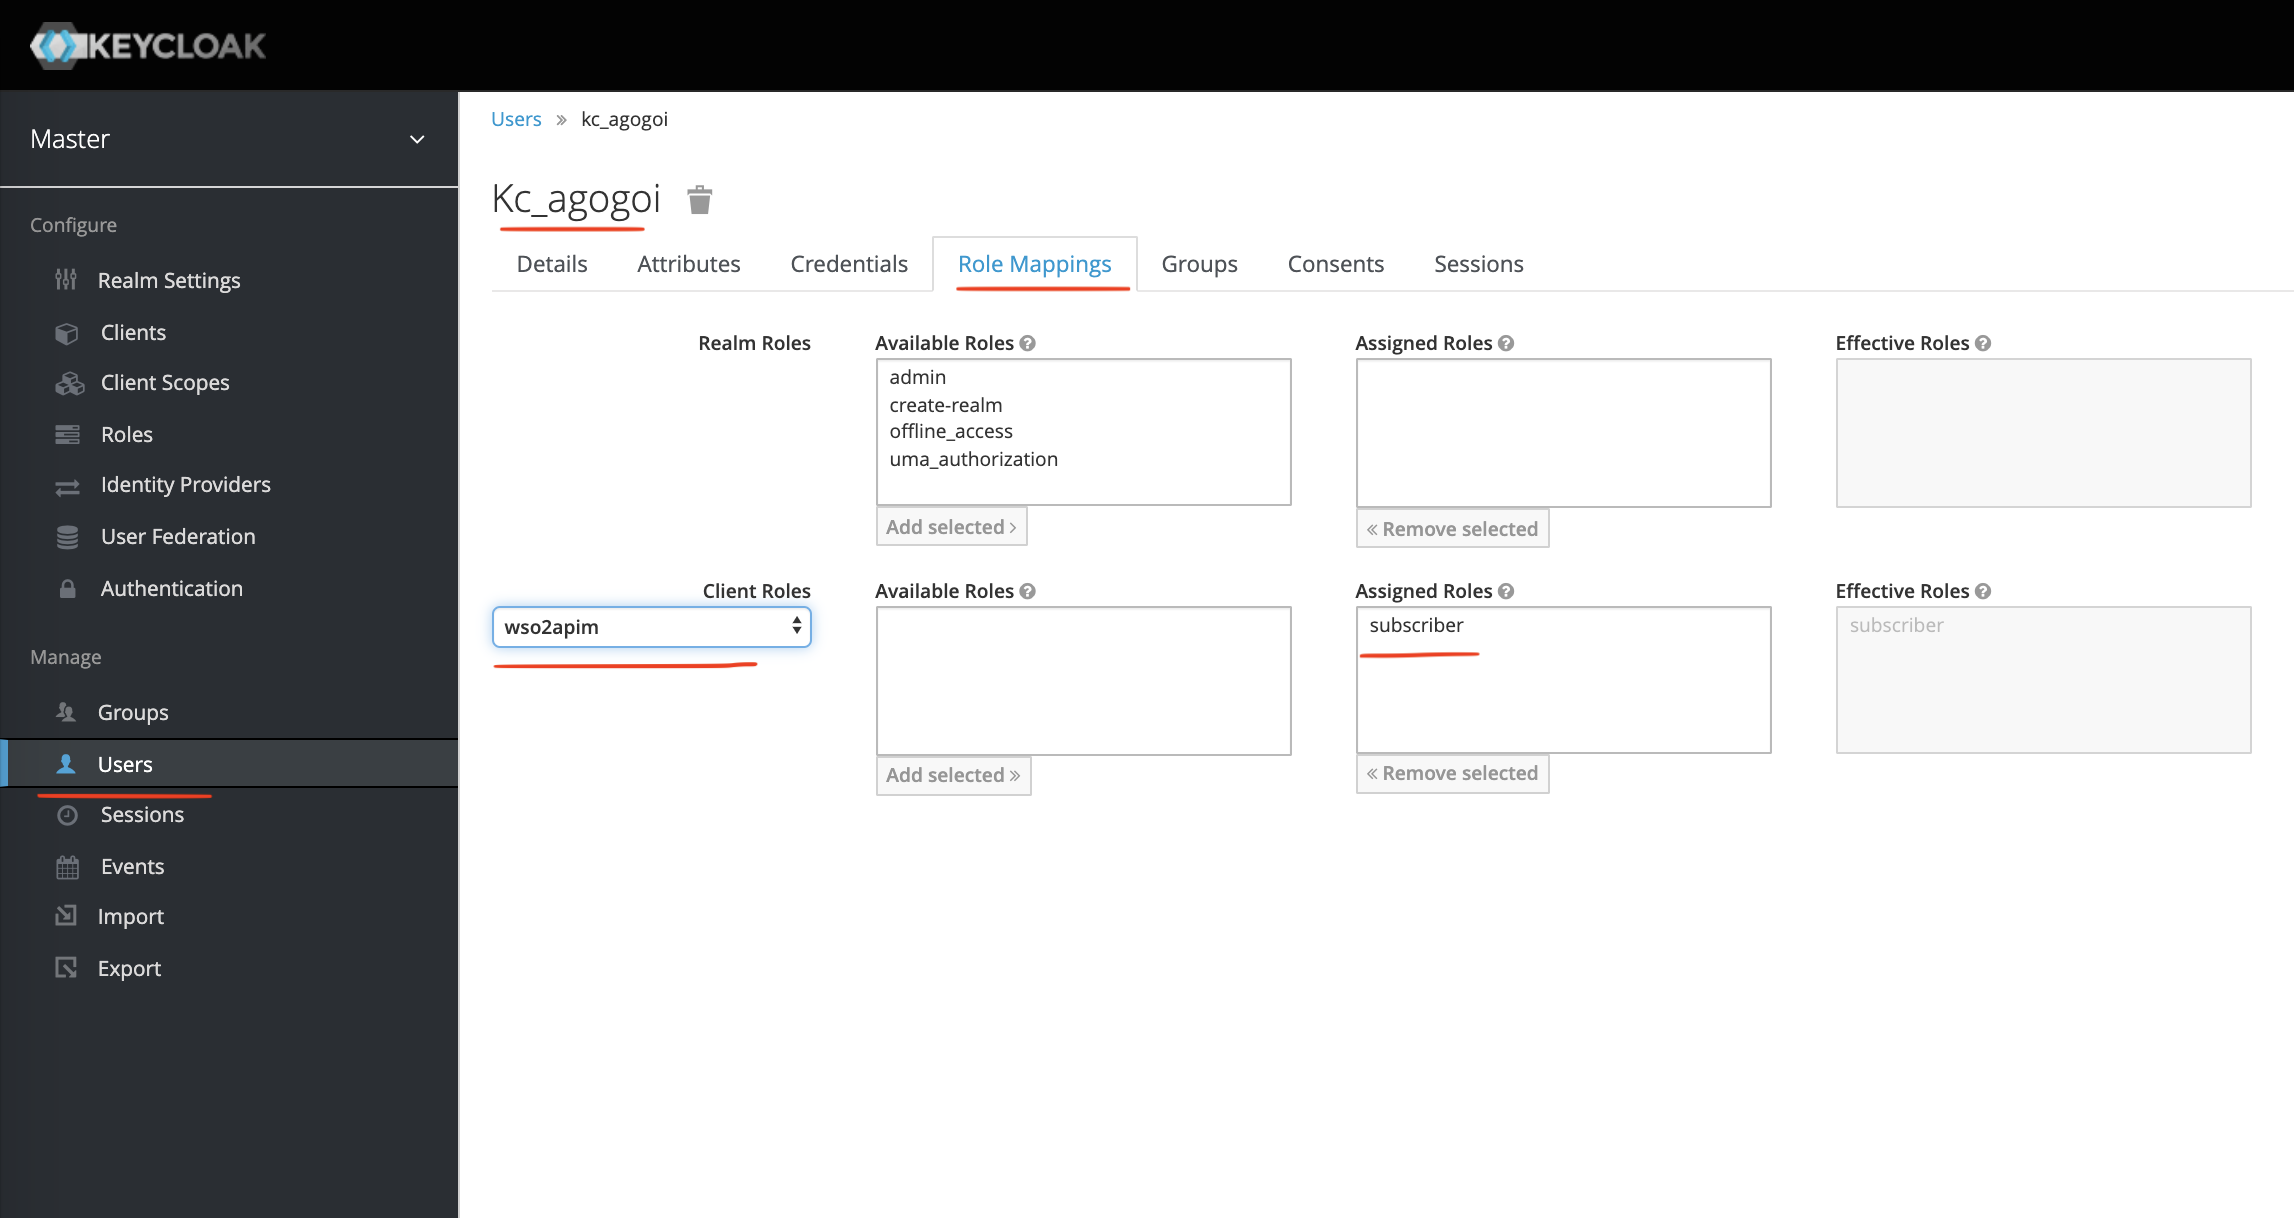
Creating demo users
The most important thing is to do Role Mappings as shown above. We are adding the subscriber role (defined in the client wso2apim) to the user kc_agogoi.
Verify The User
Let's verify the user by the CURL command.
$ curl -k -X POST \
https://idp.keycloak.com:8444/auth/realms/master/protocol/openid-connect/token \
-H 'Content-Type: application/x-www-form-urlencoded' \
-H 'cache-control: no-cache' \
-d 'username=kc_agogoi&password=123456&grant_type=password&client_id=wso2apim&client_secret=f7e77e99-c283-4bdb-9030-9a836c66111b'
Important parameters in the request.
usernamekc_agogoipassword123456grant_typepasswordclient_idwso2apimclient_secret
The secret we saw in the Credentials tab of the client wso2apim.
Here is a sample response (decoded),
{
"jti": "eabae823-f3f1-4c13-a687-bd837c0cf952",
"exp": 1564932485,
"nbf": 0,
"iat": 1564932425,
"iss": "https://idp.keycloak.com:8444/auth/realms/master",
"aud": "account",
"sub": "kc_agogoi",
"typ": "Bearer",
"azp": "wso2apim",
"auth_time": 0,
"session_state": "dc40d2f1-6190-49c8-a0f7-3c394add8f24",
"acr": "1",
"resource_access": {
"wso2apim": {
"roles": [
"subscriber"
]
},
"account": {
"roles": [
"manage-account",
"manage-account-links",
"view-profile"
]
}
},
"scope": "email profile",
"email_verified": false,
"role": [
"subscriber"
],
"name": "Anupam Gogoi",
"preferred_username": "kc_agogoi",
"given_name": "Anupam",
"family_name": "Gogoi"
}
Check the sub and role claim. We are good to go now for the next steps.
WSO2 API Manager Configuration
API Manager configuration is crucial for the SSO to figure . within the section above, we've configured an OpenID-connect client in Keycloak. Now, we'll need to configure a Federated Identity Provider in WSO2 API Manager which will authenticate with the OpenID-connect client (wso2apim) in Keycloak.
So, first, let's check which Federated Authenticators are available within the WSO2 API Manager (2.6.0) product.
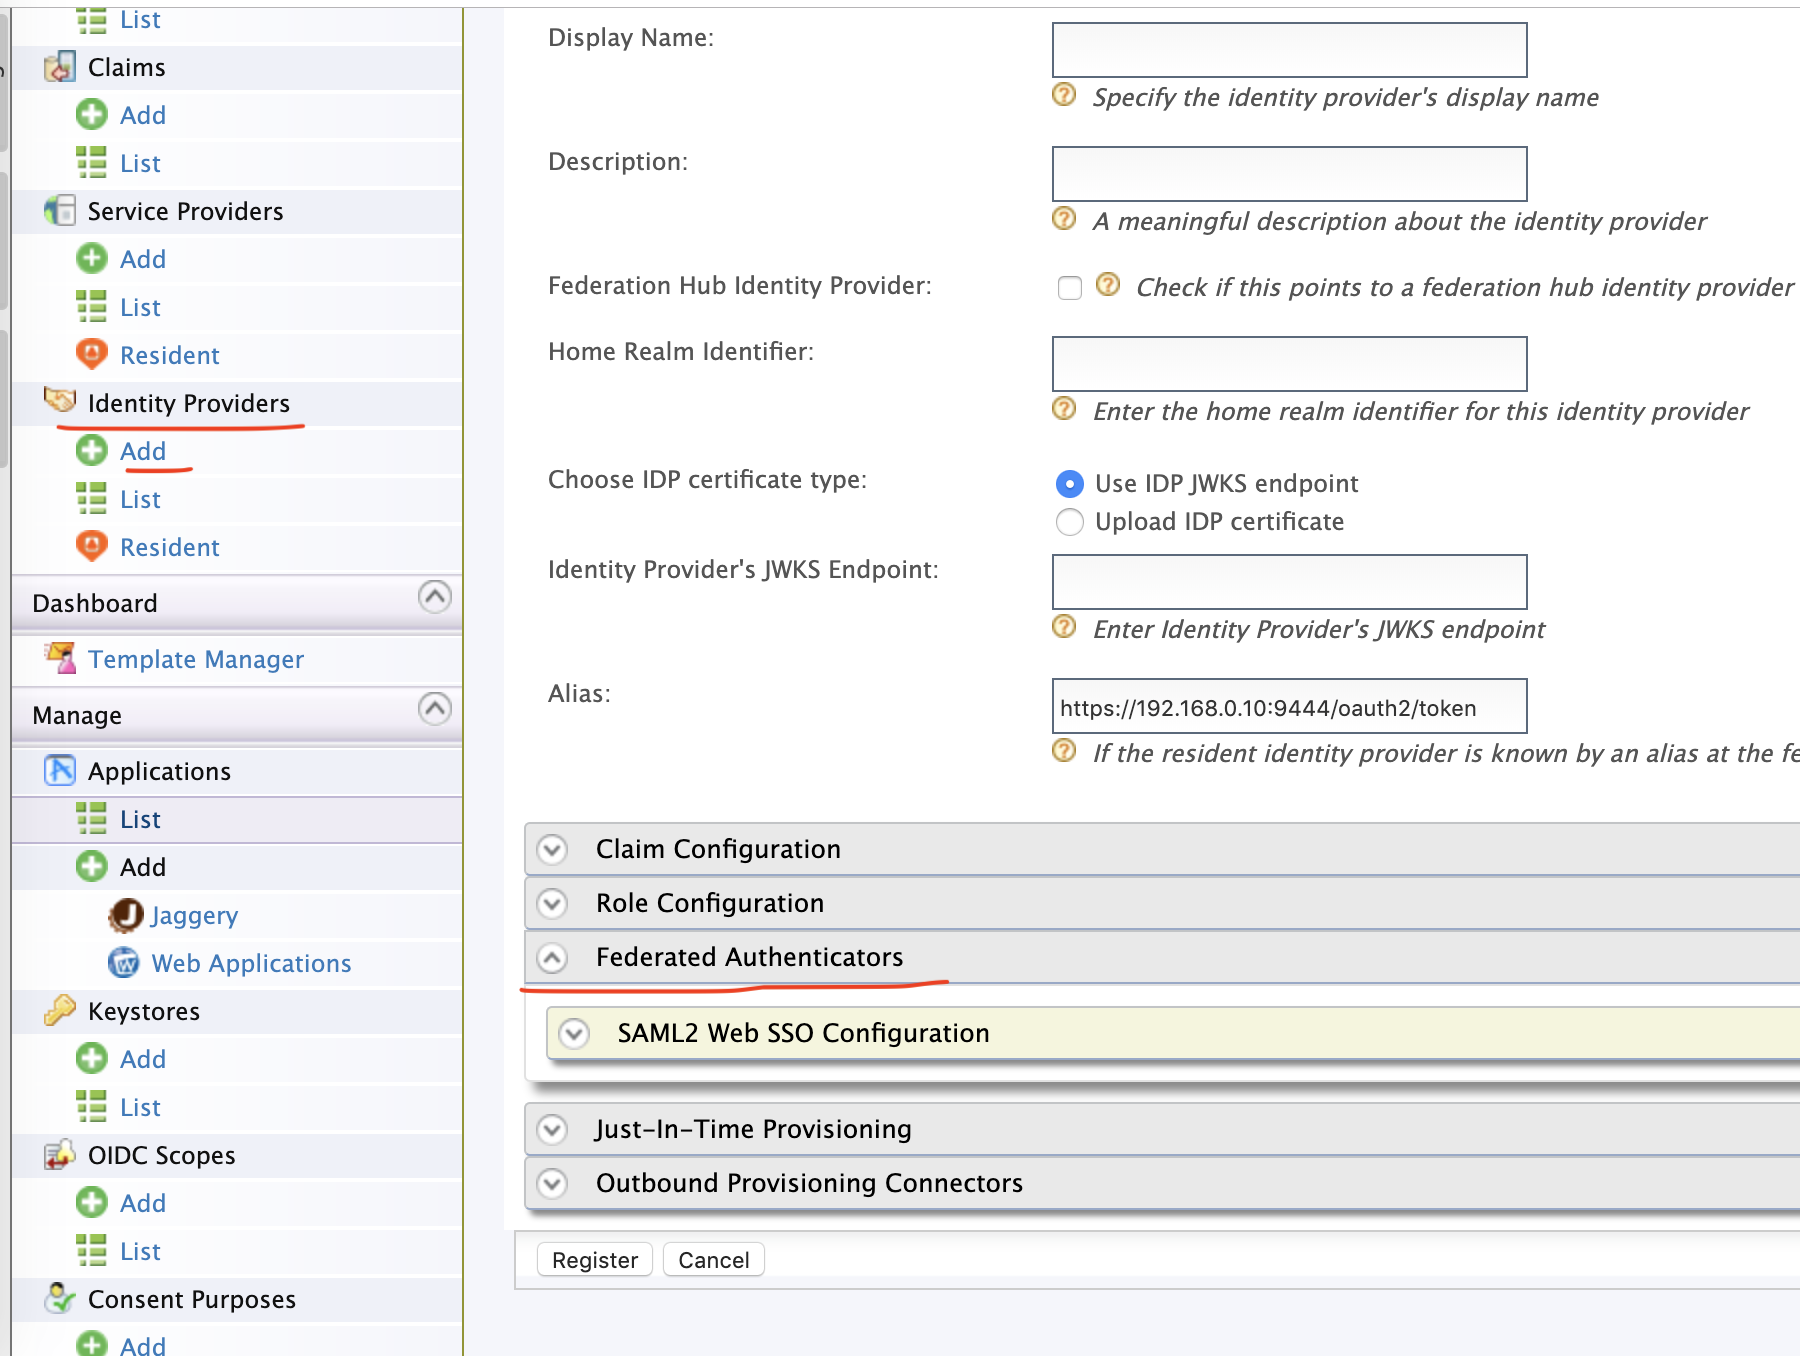
Checking available authenticators
Check that we've only SAML federated authenticator available by default. and that is the most reason why you ought to use the WSO2 Identity Server that comes bundled with all the required authenticators.
But for this tutorial, i'm not using WSO2 IS. So, how will I achieve the goal?
Well, there's a workaround. If you've got WSO2 IS (5.7.0) downloaded in your machine look for the subsequent jar file,
$ wso2is-5.7.0/repository/components/dropins/org.wso2.carbon.identity.application.authenticator.oidc-5.1.23.jar
Copy it and paste it within the dropins folder of the WSO2 API Manager.
$ wso2am-2.6.0/repository/components/dropins/
Now, restart the API Manager and you ought to see the OAuth2/OpenID connector.

OAuth2/OpenID connector
Configure Truststore
Before proceeding, let's add the general public certificate (server.crt) of Keycloak to the client-truststore.jks of API Manager.
$ keytool -import -alias keycloak -file server.crt -keystore client-truststore.jks -storepass wso2carbon
Then, restart the server.
Configure Federated IDP
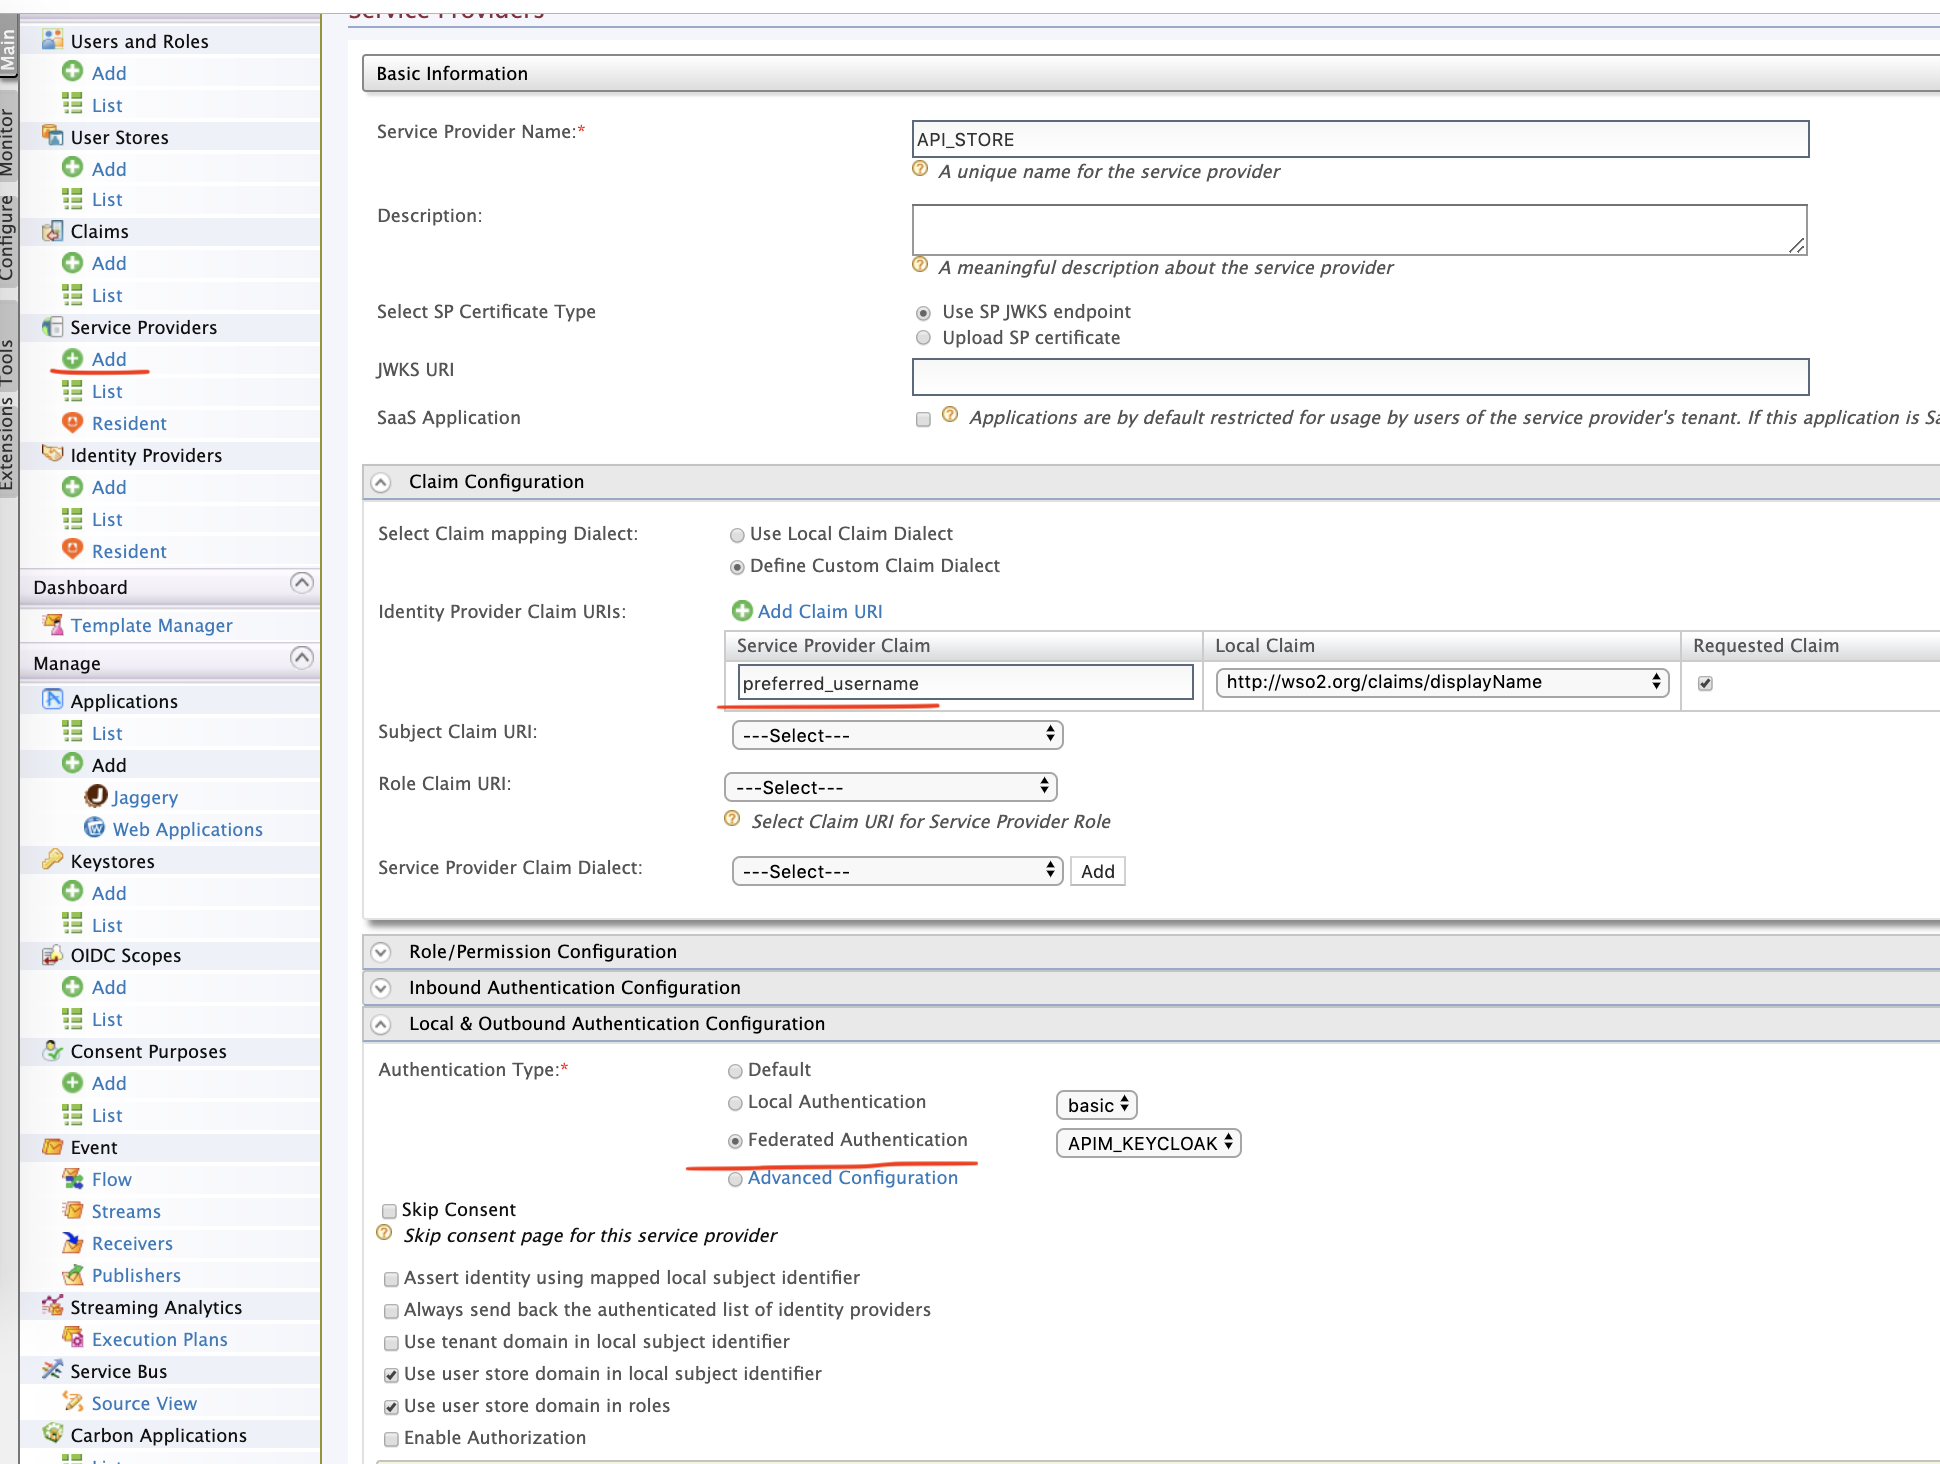
Create a federated IDP named APIM_KEYCLOAK, as shown below.
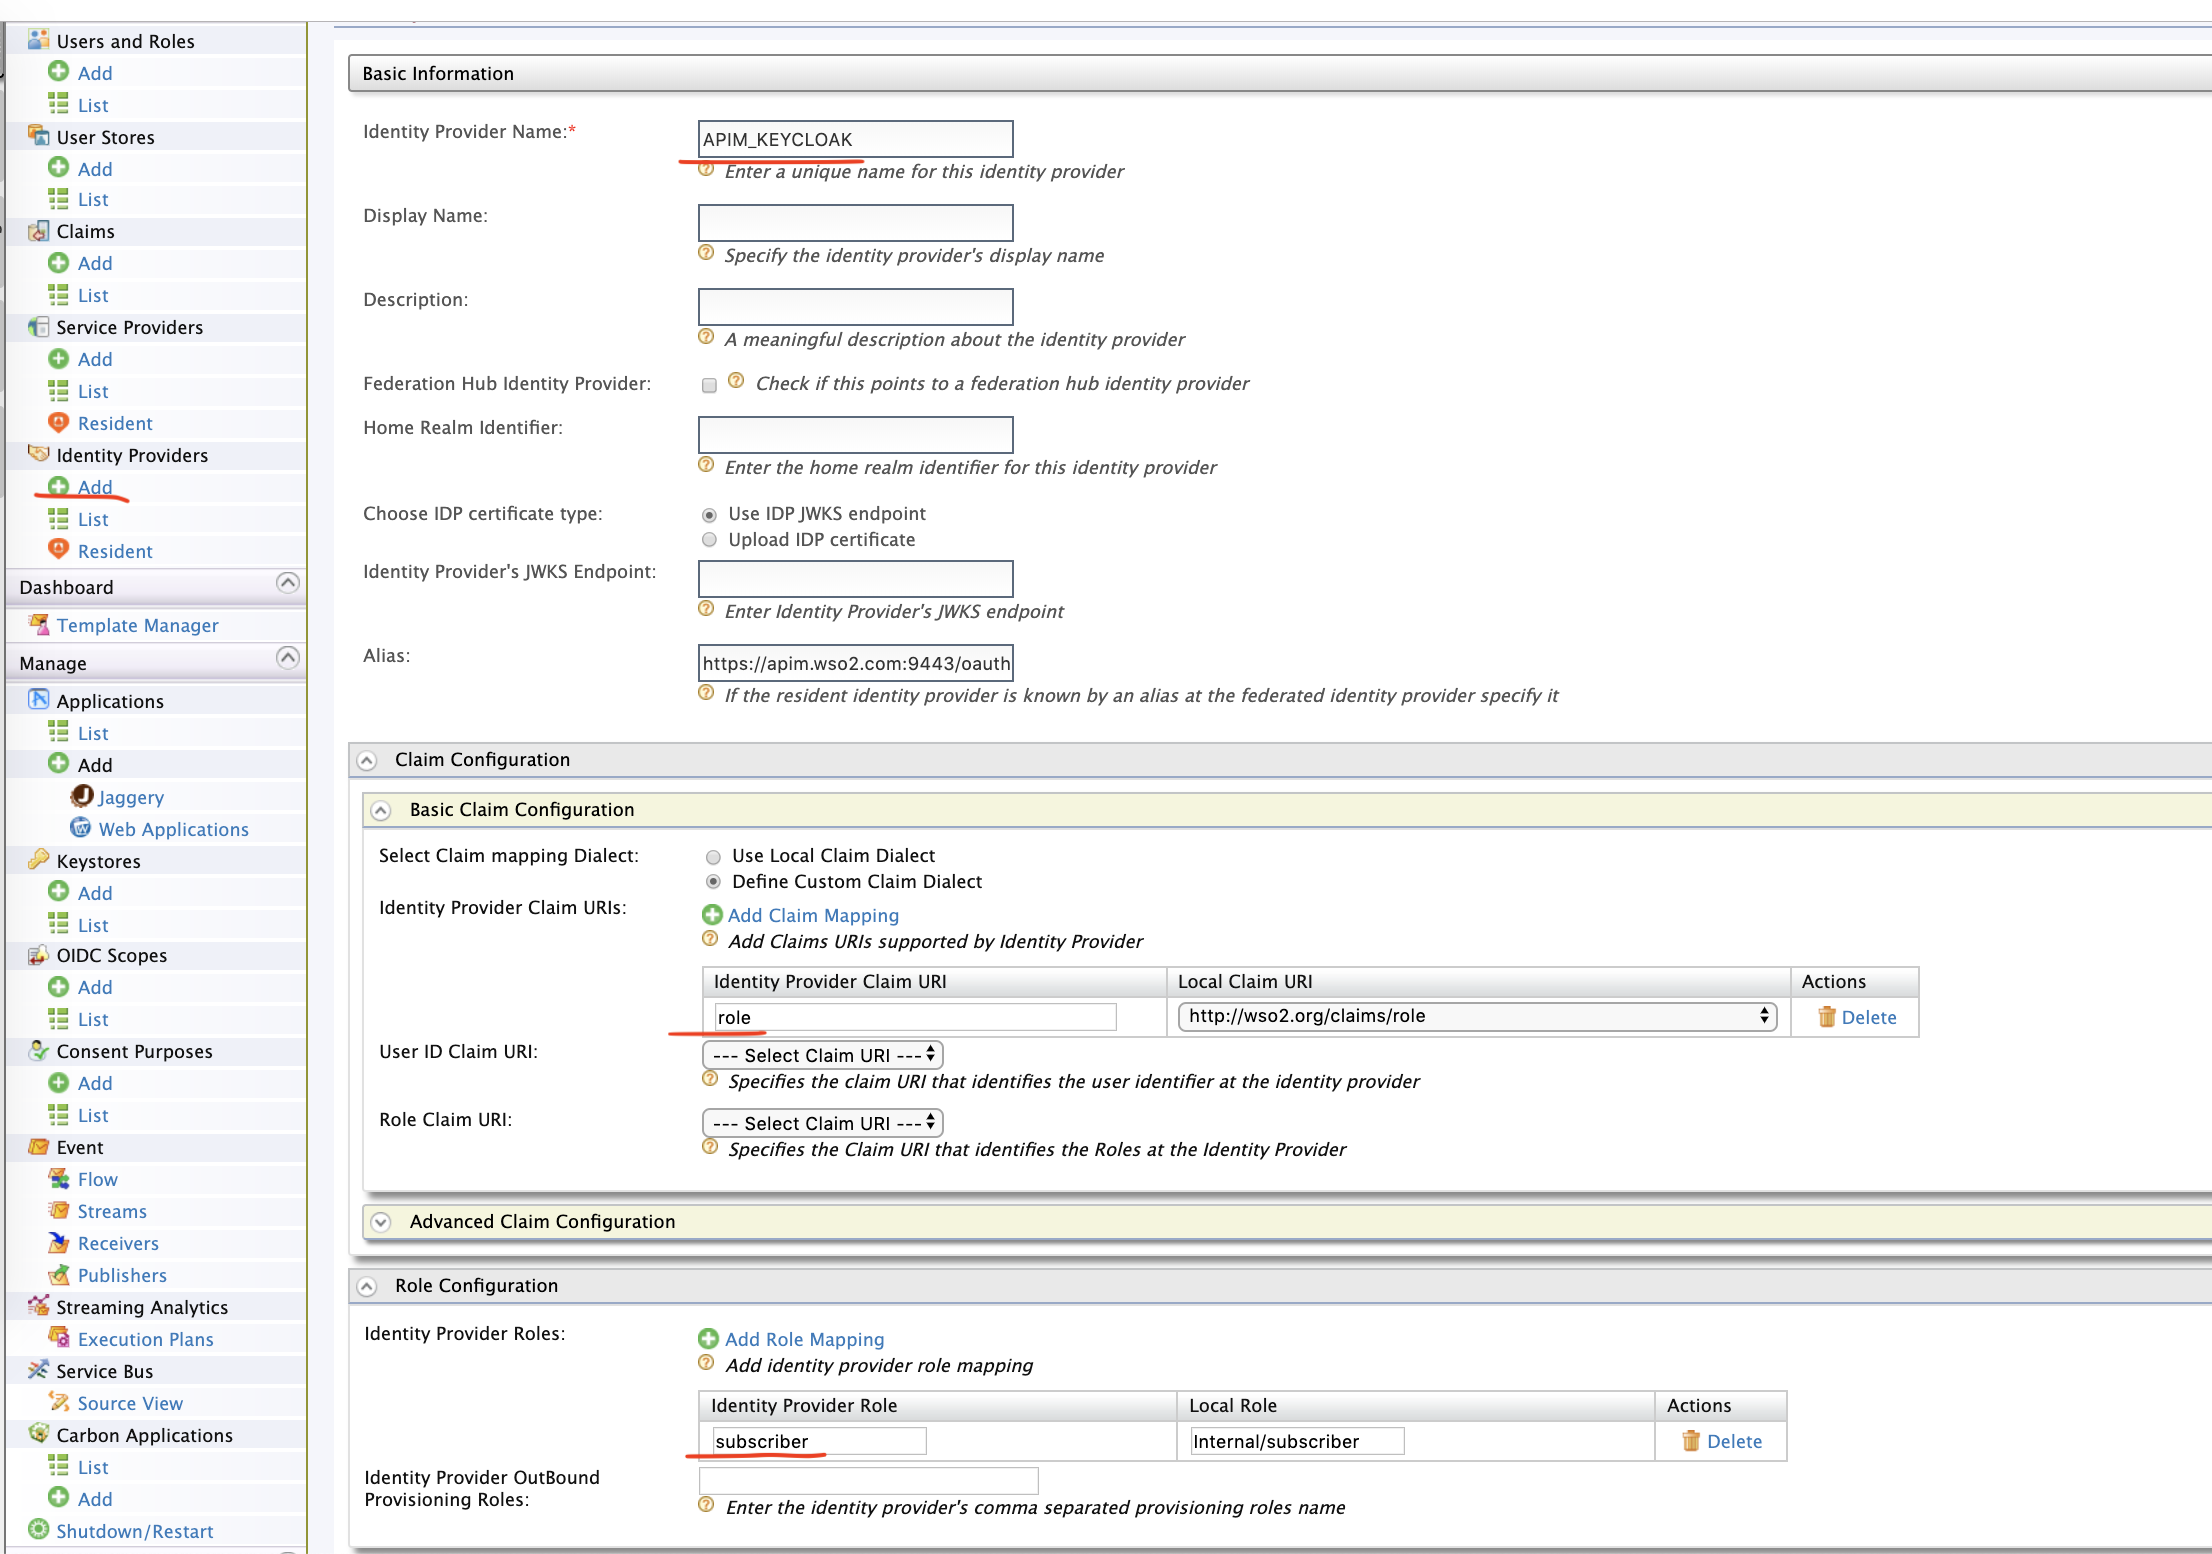
Creating deferated IDP
Make a note on the Claim Configuration and Role Configuration. We are mapping the role claim from Keycloak to the Local claim i.e WSO2 API Manager. Also, we are mapping the subscriber role from Keycloak side to Internal/subscriber role of WSO2 API Manager.
Now, make the OpenID authenticator configuration as shown below,
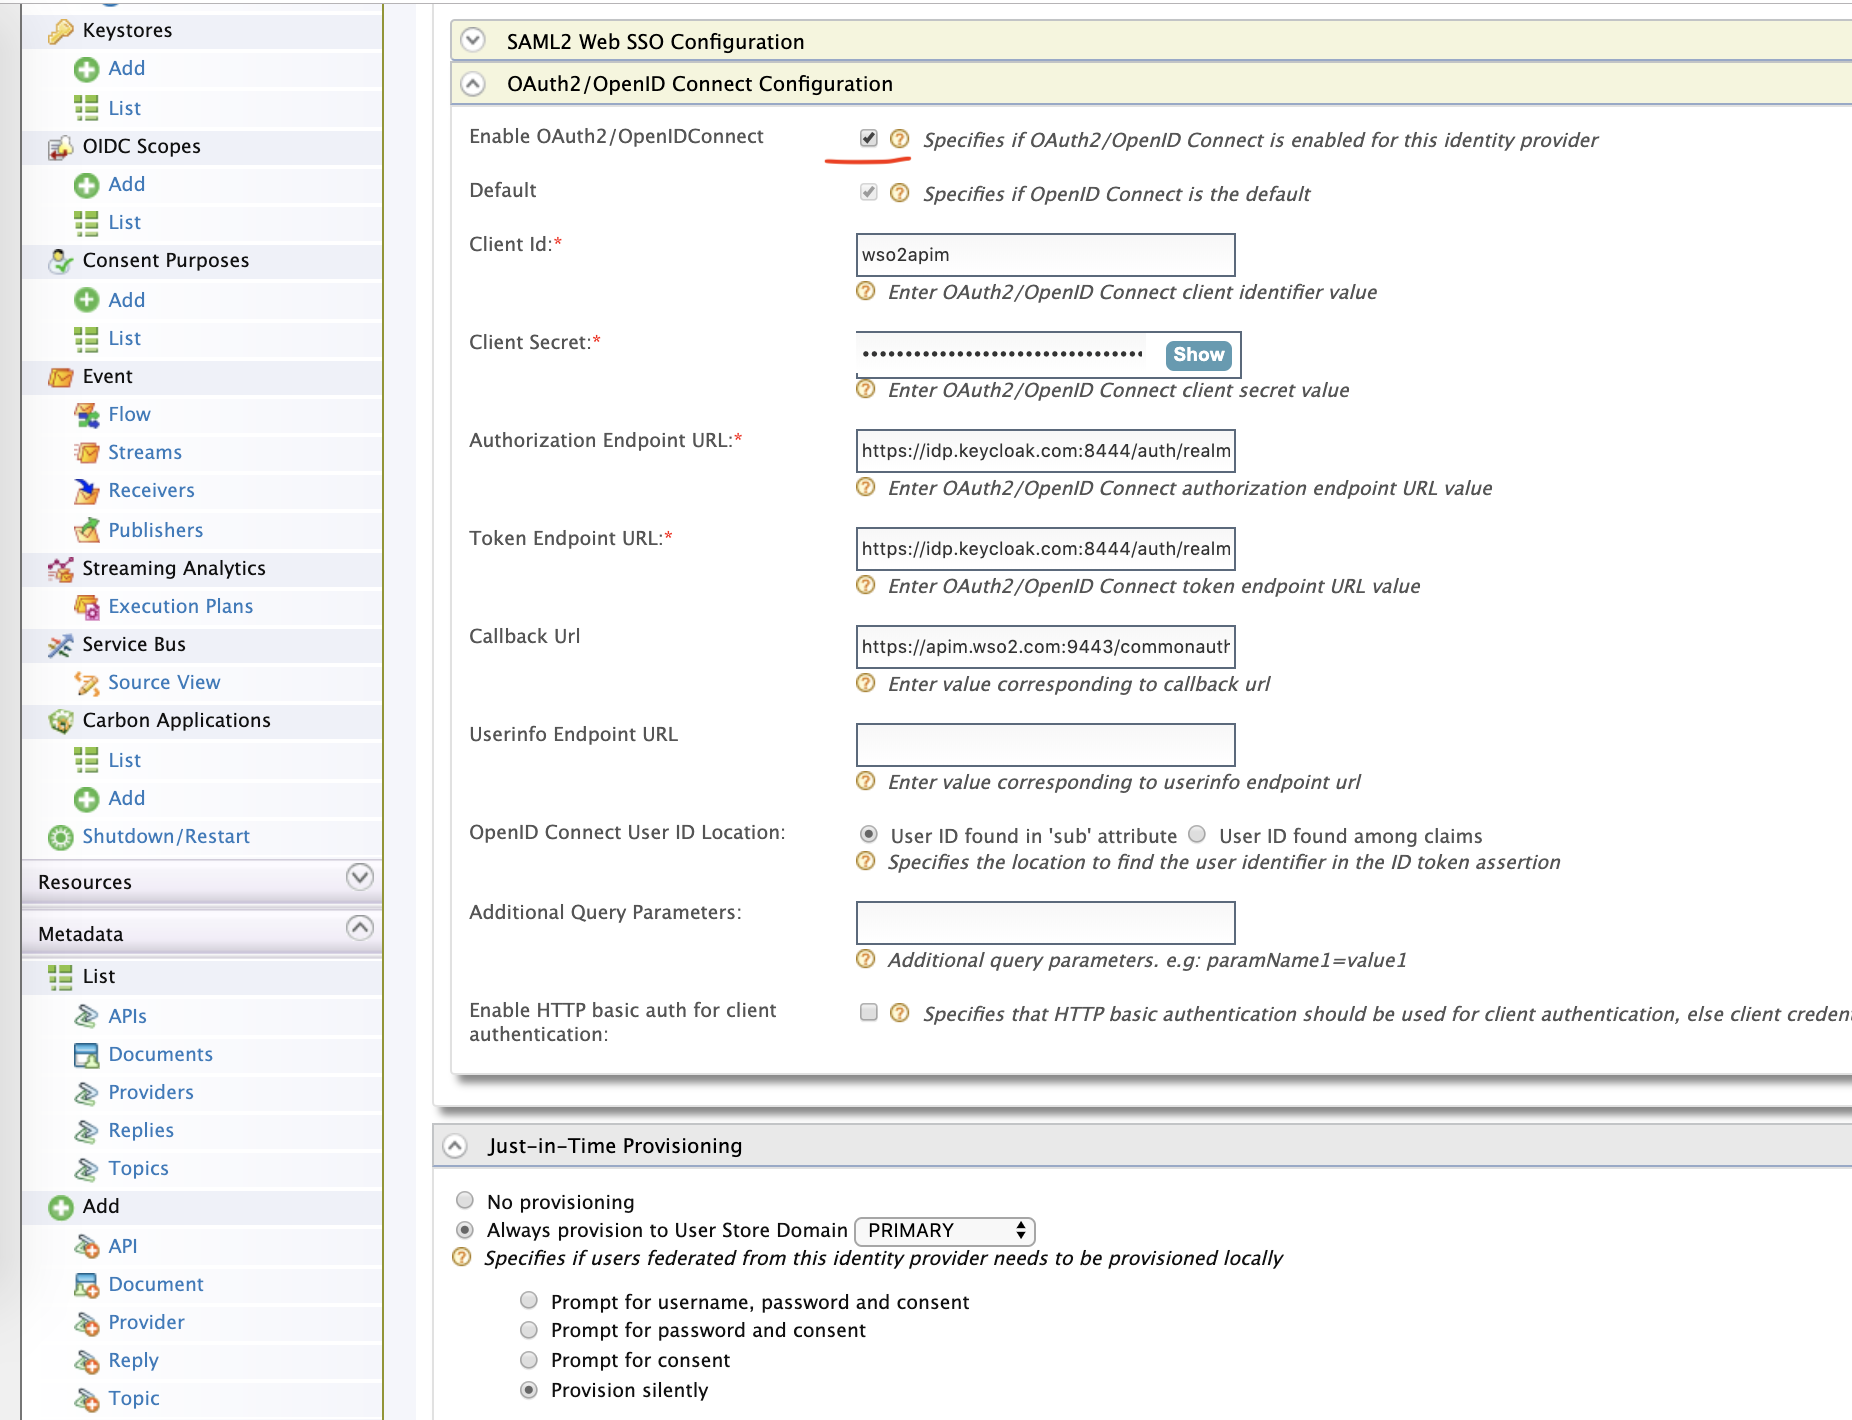
OpenID authenticator configuration
The information, such as Authorization, Token URL can be found from the well-known endpoint of the Keycloak, as shown in the Keycloak configuration part.
Configure Service Provider
Let's configure a service provider as shown below.
Configuring service provider
Configure site.conf for Store
Here is a sample configuration.
"oidcConfiguration" : {
"enabled" : "true",
"issuer" : "API_STORE",
"identityProviderURI" : "https://apim.wso2.com:9443/oauth2/token",
"authorizationEndpointURI" : "https://apim.wso2.com:9443/oauth2/authorize",
"tokenEndpointURI" : "https://apim.wso2.com:9443/oauth2/token",
"userInfoURI" : "https://apim.wso2.com:9443/oauth2/userinfo",
"jwksURI" : "https://apim.wso2.com:9443/oauth2/jwks",
"logoutEndpointURI" : "https://apim.wso2.com:9443/oidc/logout",
"authHttpMethod": "POST",
"clientConfiguration" : {
"clientId" : "XH5vjX1VIKBLlWq_2GmgeVHbDDga",
"clientSecret" : "RUZ39KRhy59AFx7f5b_zNfR8quMa",
"responseType" : "code",
"authorizationType" : "authorization_code",
"scope" : "phone email address openid profile",
"redirectURI" : "https://apim.wso2.com:9443/store/jagg/jaggery_oidc_acs.jag",
"postLogoutRedirectURI" : "https://apim.wso2.com:9443/store/",
"clientAlgorithm" : "RS256"
}
},
clientId and clientSecret are the credentials of the Service Provider we created in WSO2 API Manager. We have configured the site.json only for Store. It can be done for Publisher and Admin too.
Configure axis2.xml
Make a small modification in this file.
$ wso2am-2.6.0/repository/conf/axis2/axis2.xml
In <transportSender name="https"> add the following line.
<parameter name="HostnameVerifier">AllowAll</parameter>
Testing
We are good to go now.
In an incognito window, access the /store.
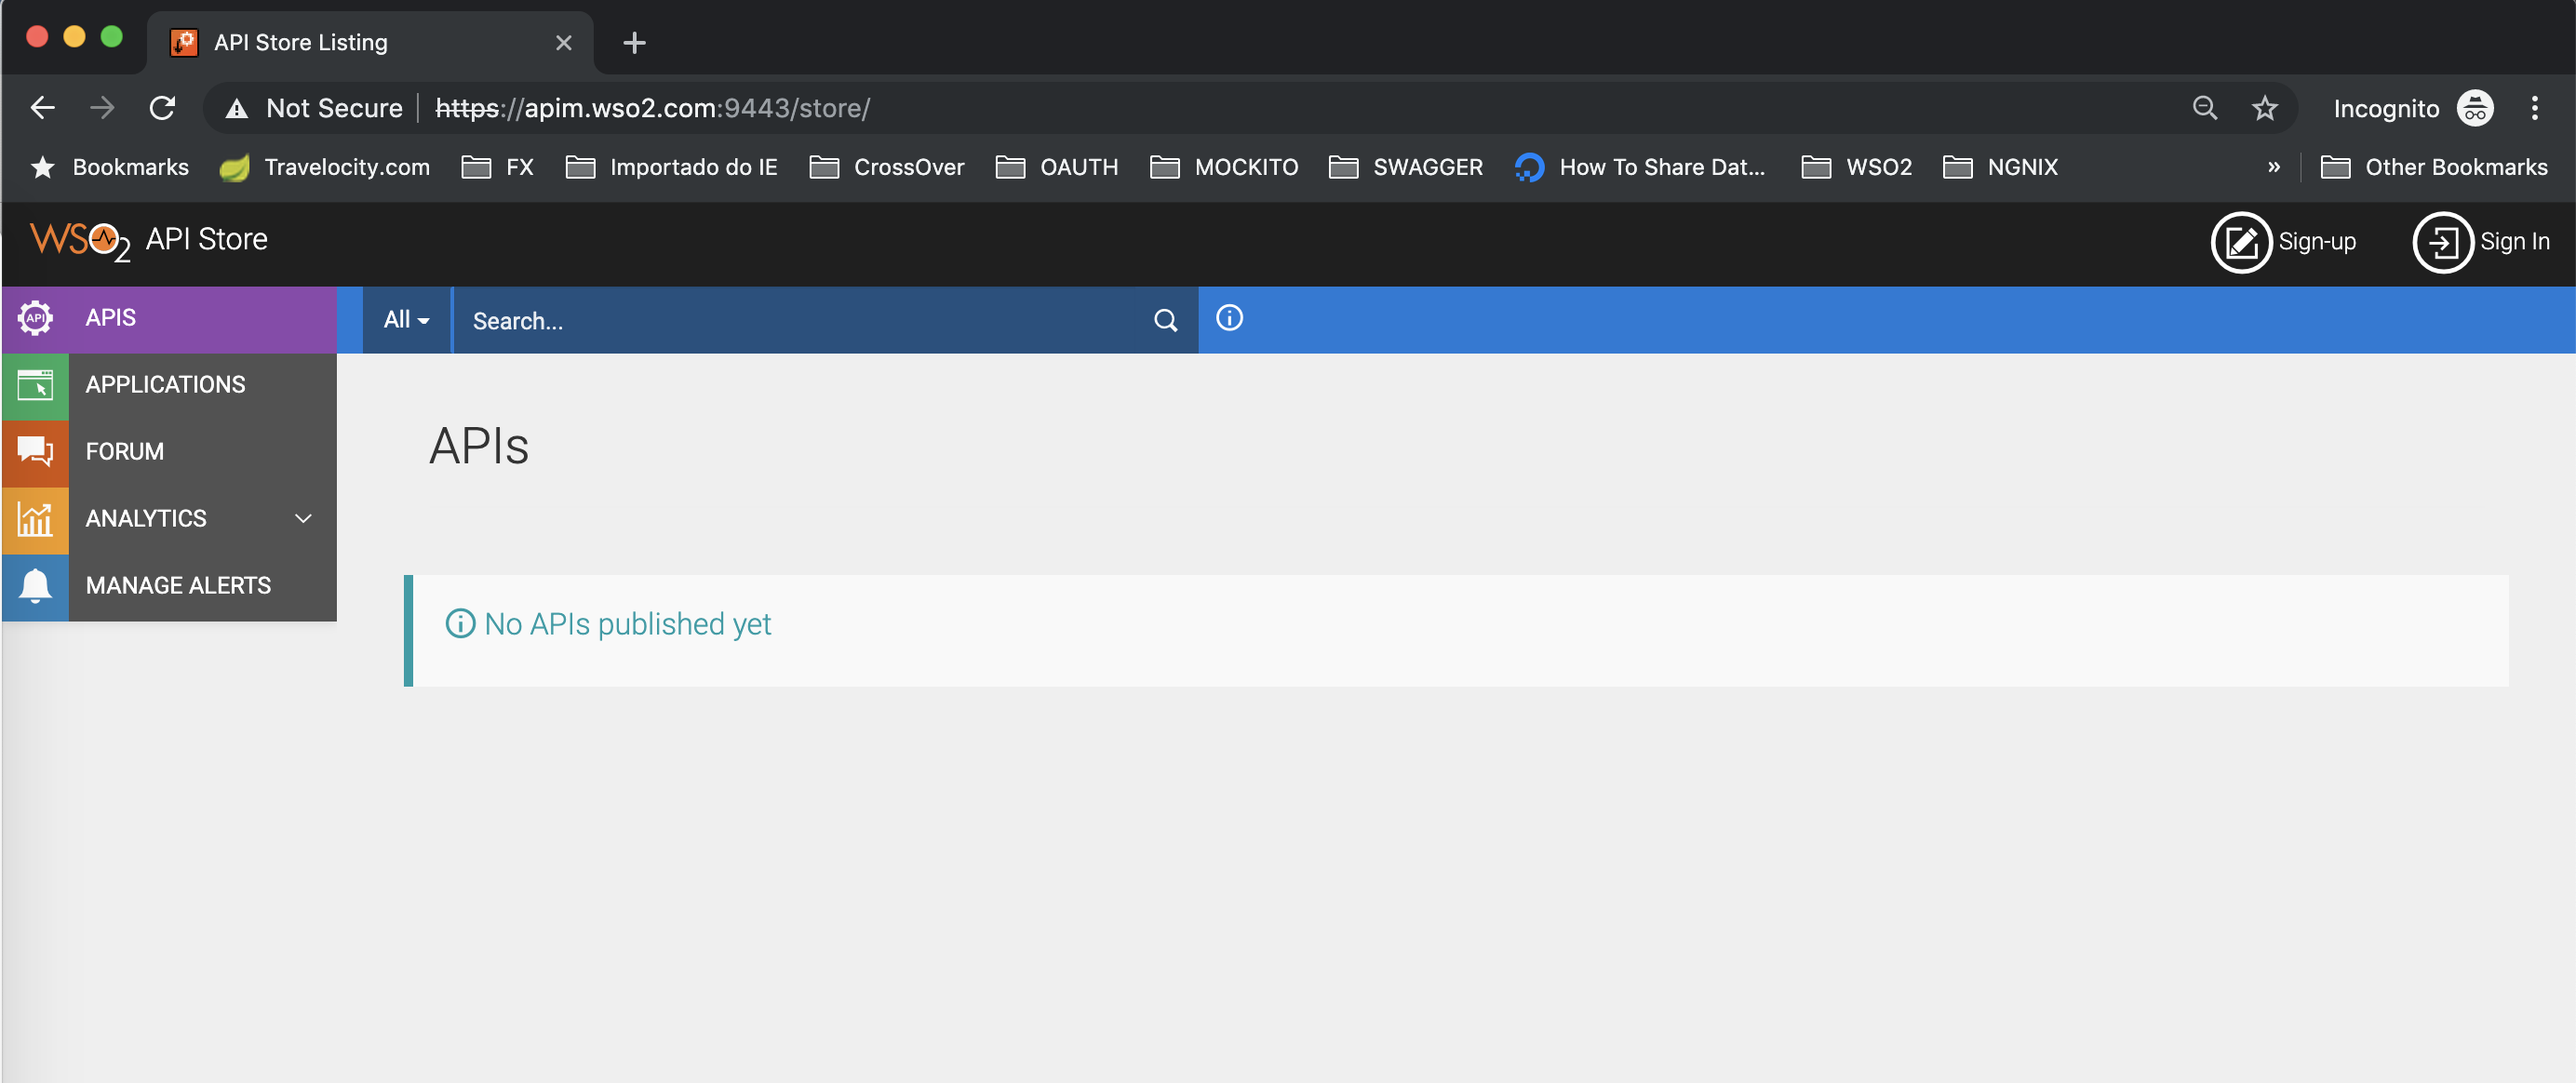
Accessing /store
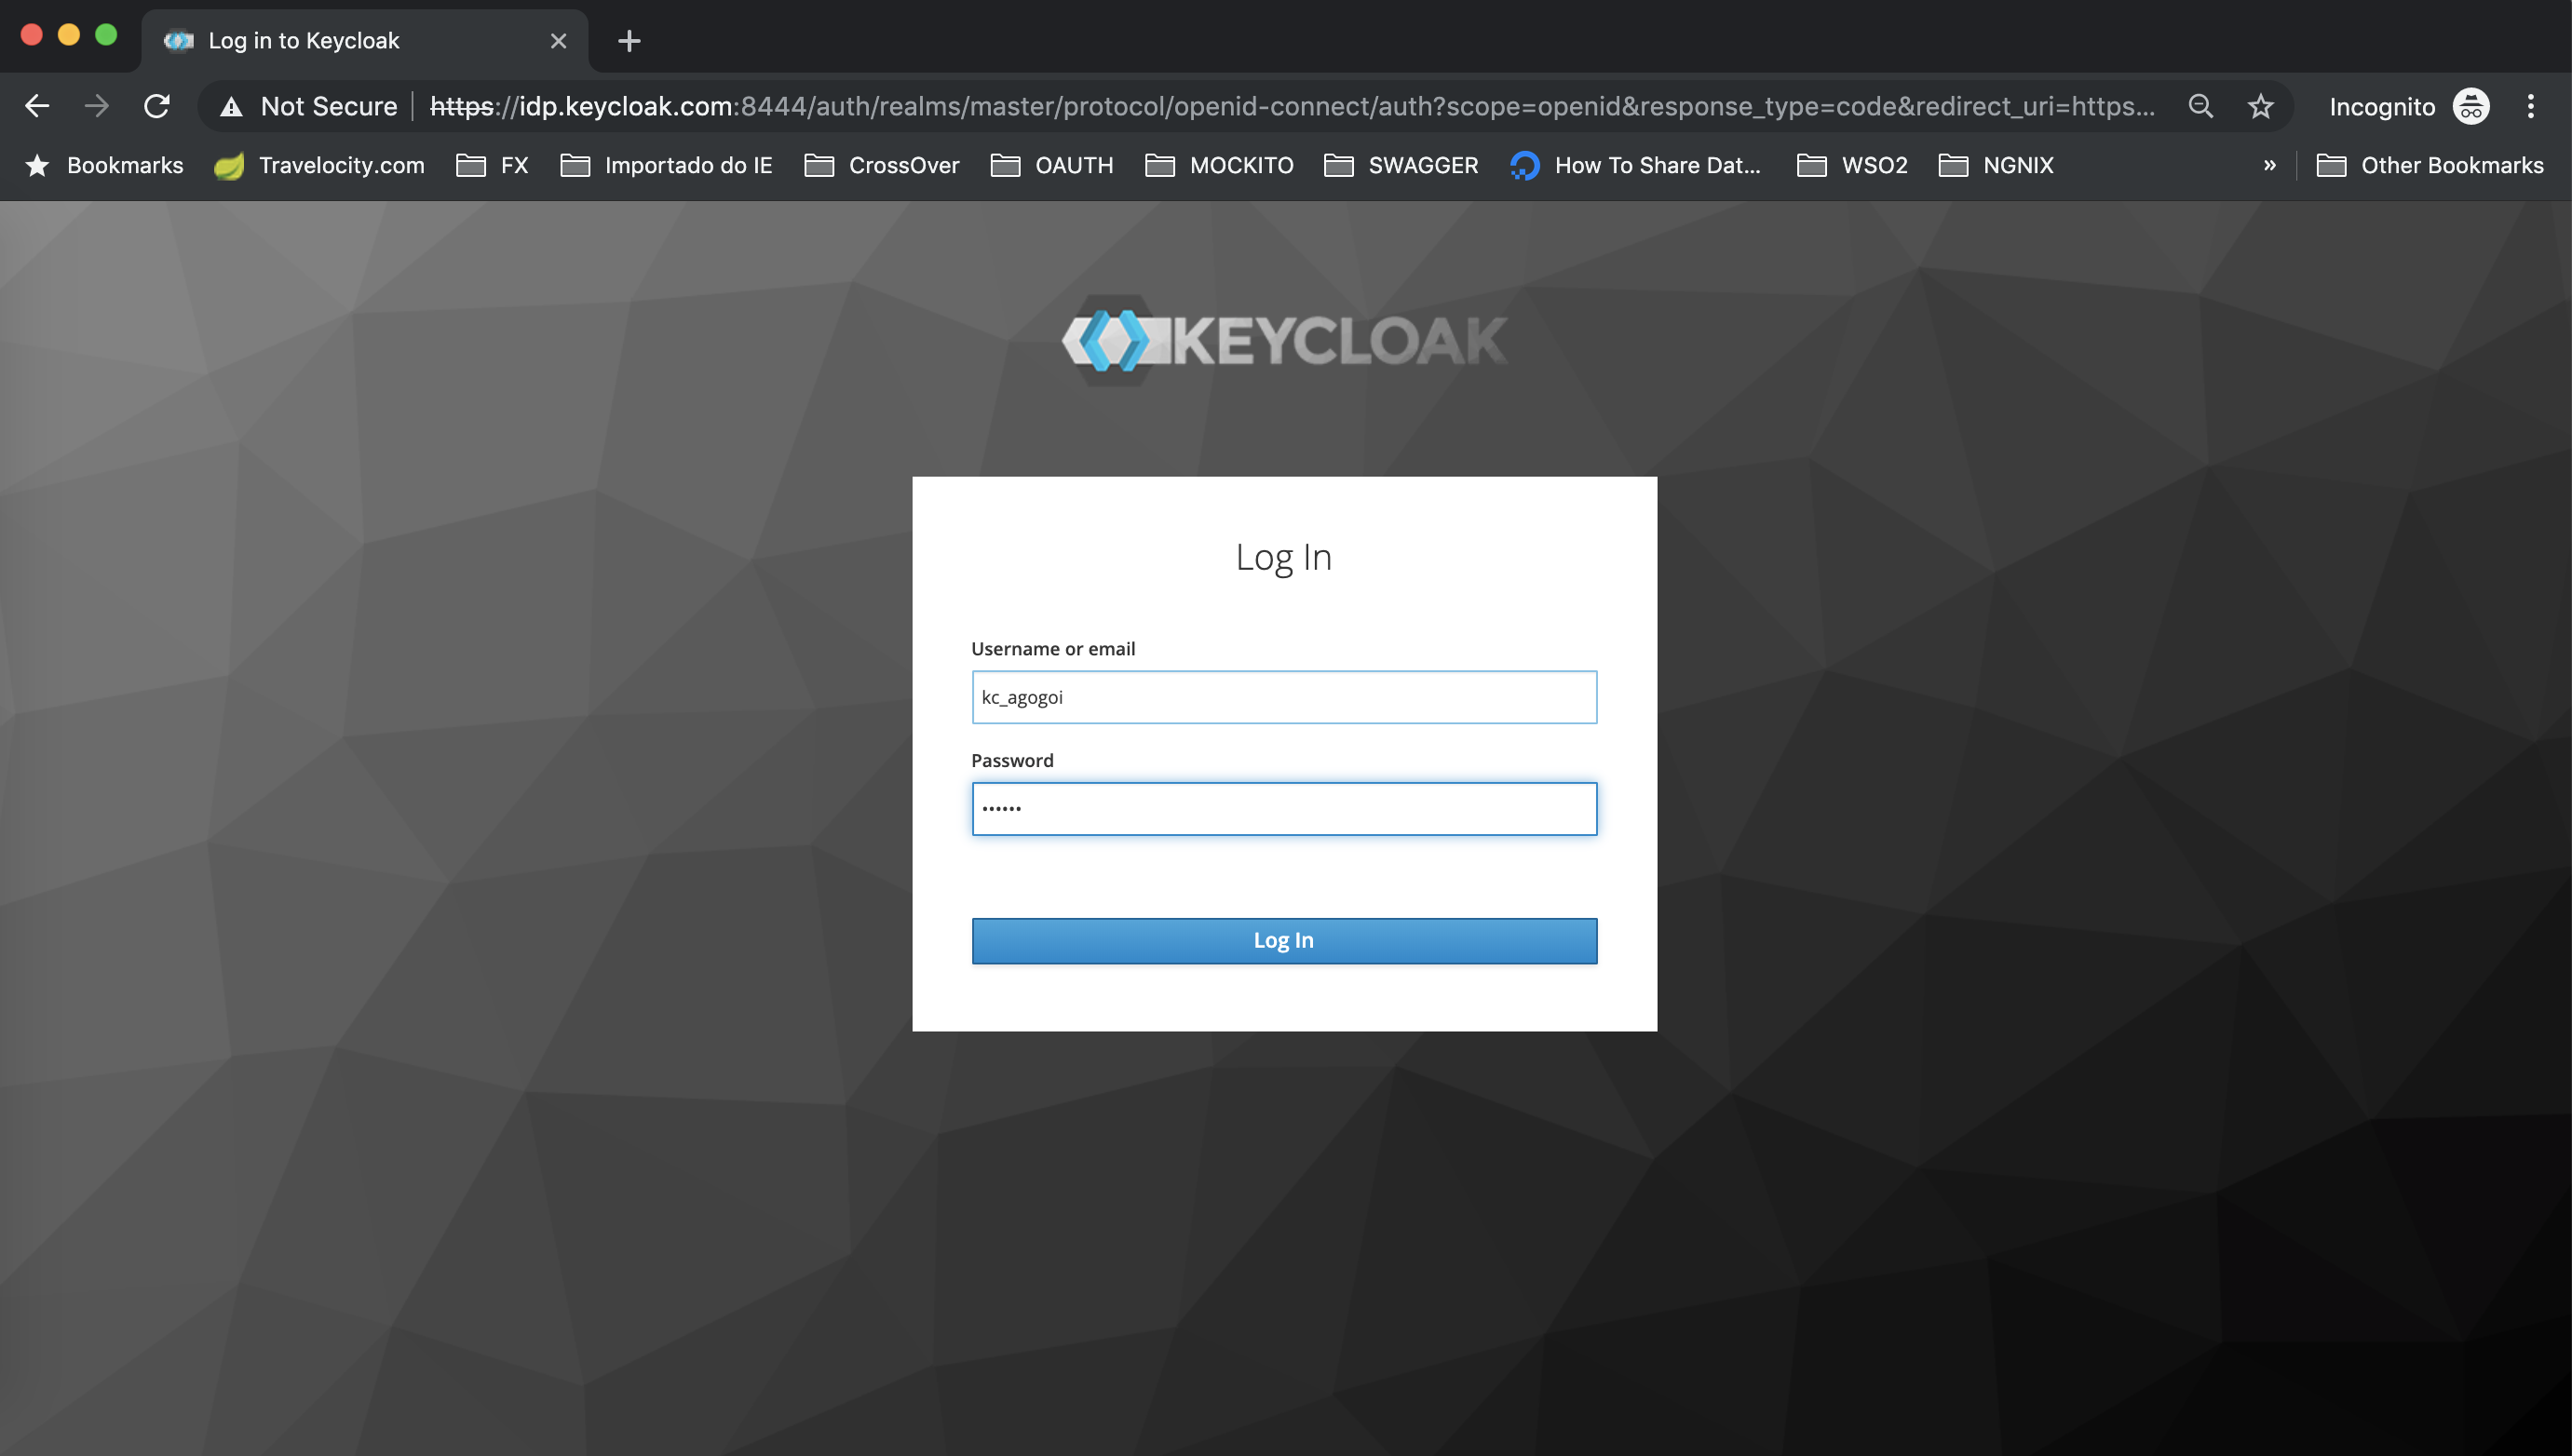
Click the Sign-in button and it will redirect to Keycloak.Login with Keycloak user.
Log in page
Approve the claims.

Approving user claims
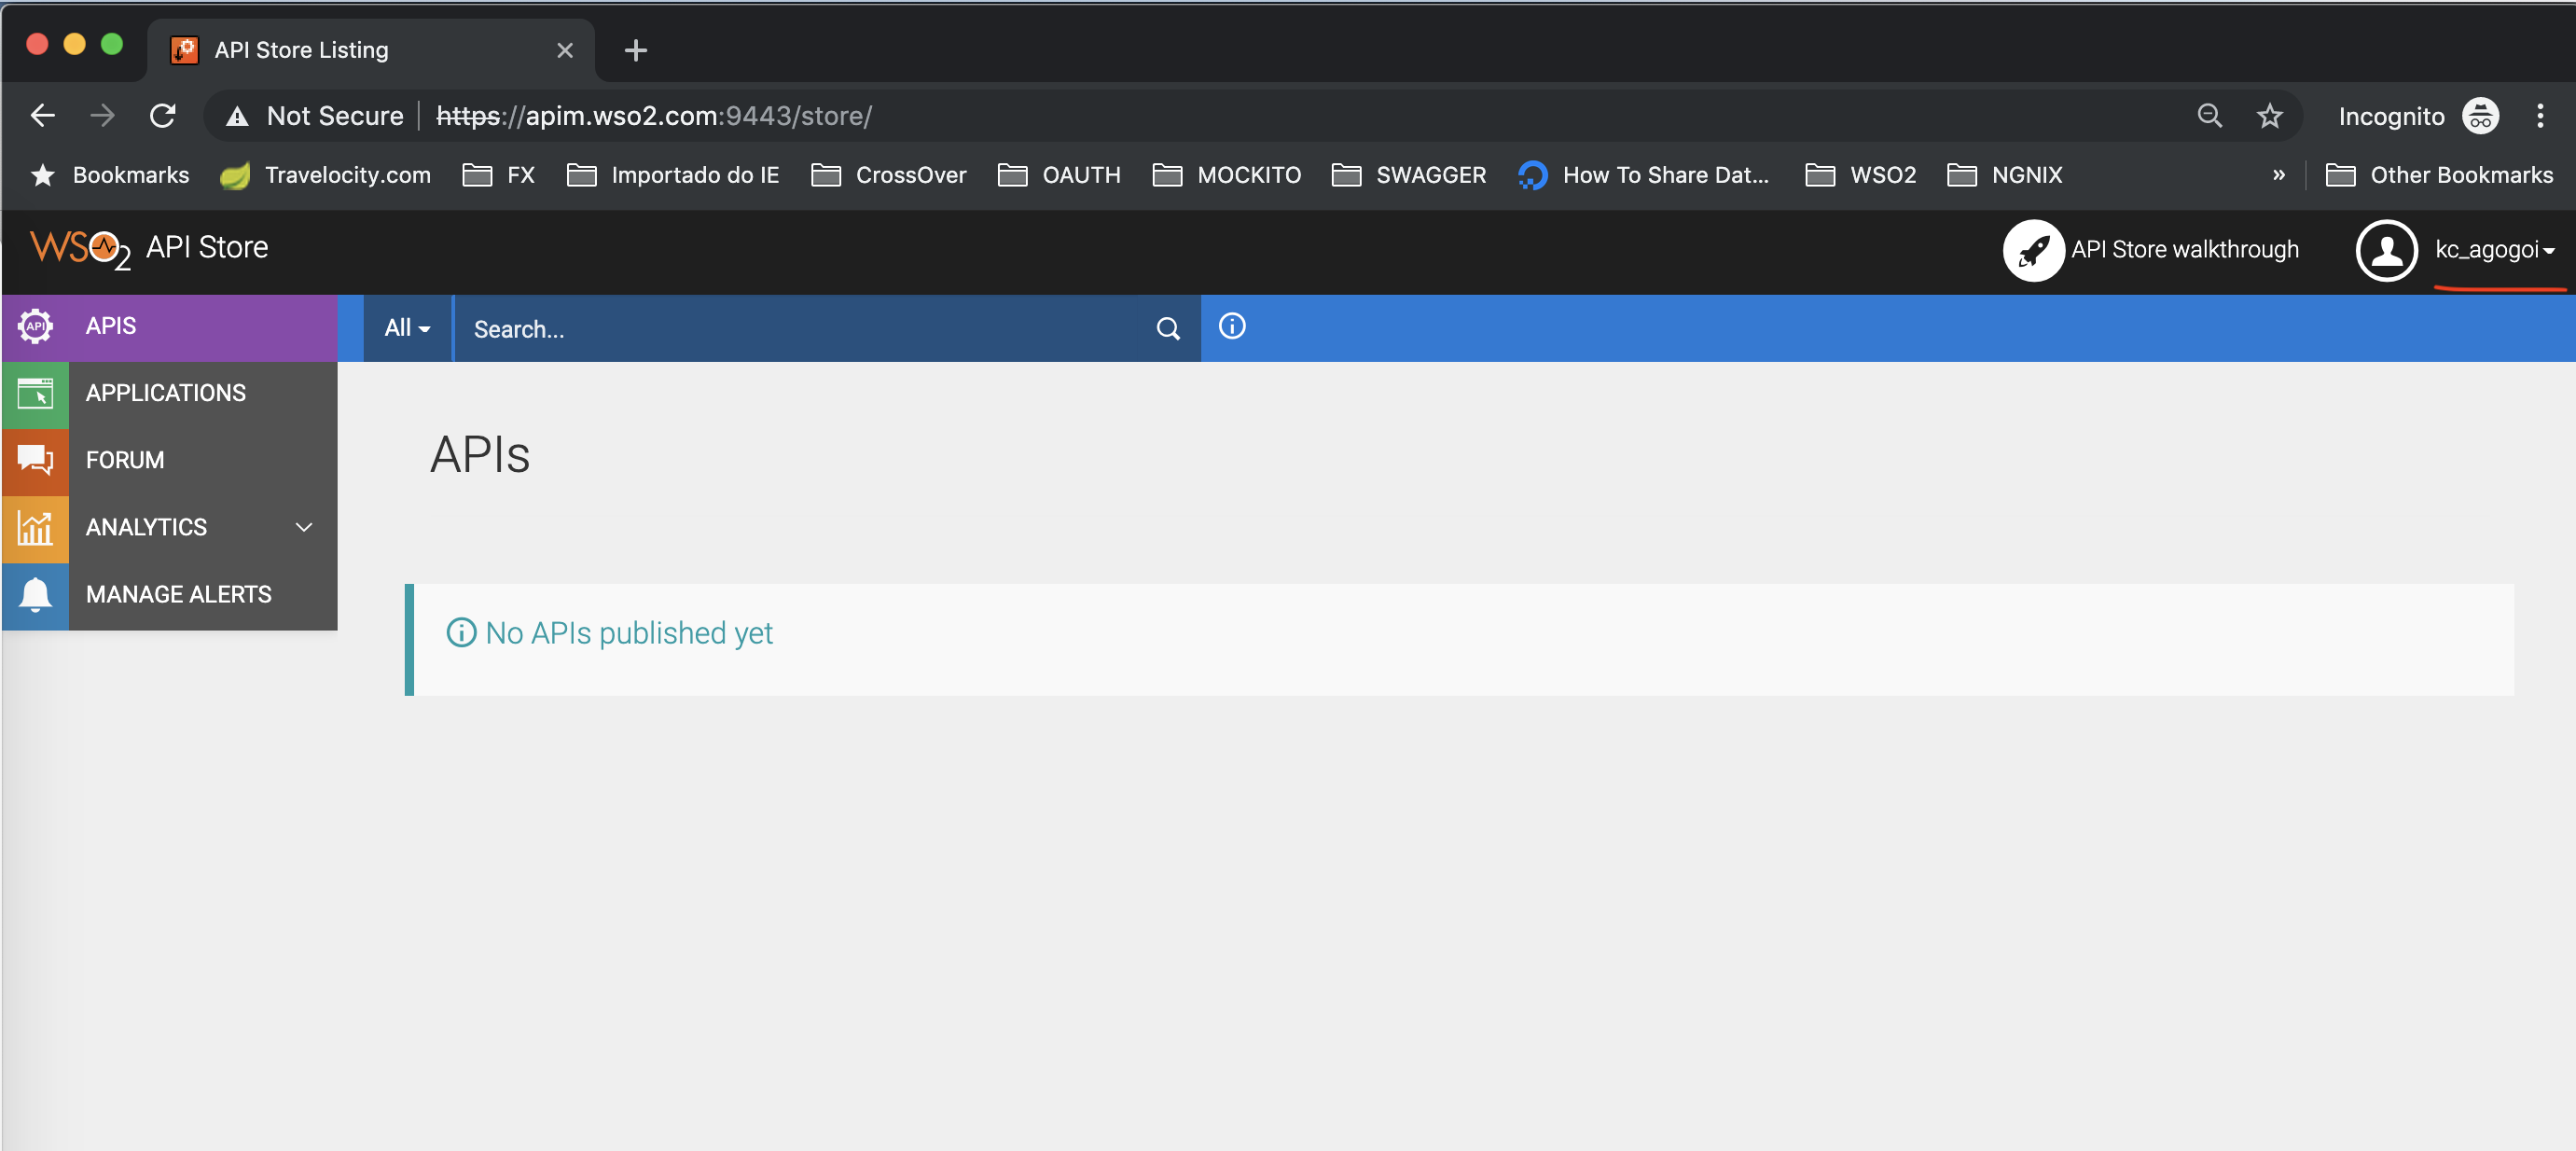
Finally, you are logged in API Store with Keycloak user.
API Store
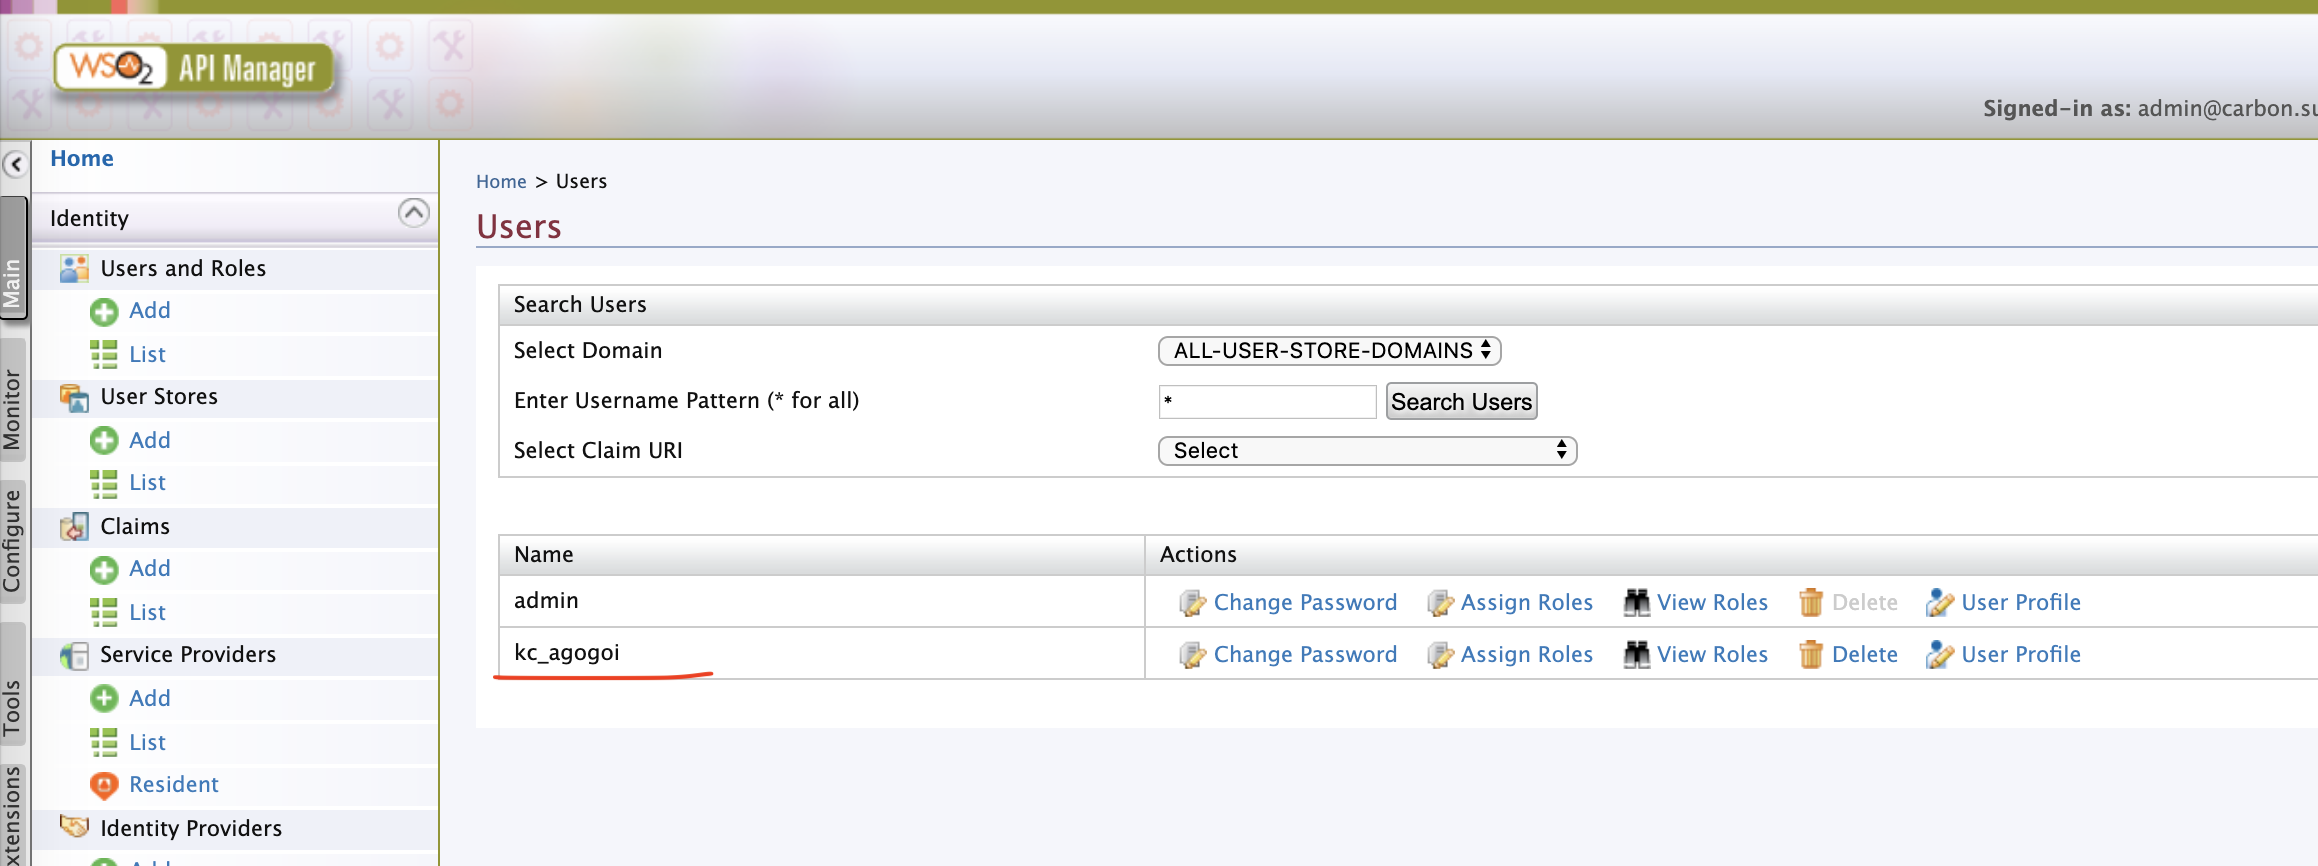
In /carbon, check the Users and you can see the user i.e kc_agogoi provisioned.
API manager
That's it. We are done.
Deep Diving
It's a good idea to know what goes inside. For that, I am going to show you the internals of the classes. We are going to debug the WSO2 API Manager.
Create a project
Let's create a simple hello-world project in IntelliJ. Then, let's import the following jars to the project.
$ wso2am-2.6.0/repository/components/dropins/org.wso2.carbon.identity.application.authenticator.oidc-5.1.23.jar
$ wso2am-2.6.0/repository/components/plugins/org.wso2.carbon.identity.application.authentication.framework_5.12.153.jar
$ wso2am-2.6.0/repository/components/plugins/org.wso2.carbon.identity.claim.metadata.mgt_5.12.153.jar
The federated IDP authentication happens in the following class.
org.wso2.carbon.identity.application.authenticator.oidc.OpenIDConnectAuthenticator
The provisioning happens in this class.
org.wso2.carbon.identity.application.authentication.framework.handler.request.impl.JITProvisioningPostAuthenticationHandler
You can run WSO2 API Manager in debug mode and configure IntelliJ for remote debugging to know more details.
Conclusion
In this tutorial, I even have shown how Keycloak are often utilized in WSO2 API Manager as a federated identity provider. Also, I did a hack to put in Oauth2/OpenID connector in WSO2 API Manager. If within the future, the library dependencies of Oauth2/OpenID connector is modified this approach won't work. So, the simplest option is to use WSO2 Identity Server that comes bundled with of these connectors out of the box.


Sso — Wso2 Api Manager And Keycloak Identity Manager >>>>> Download Now
ReplyDelete>>>>> Download Full
Sso — Wso2 Api Manager And Keycloak Identity Manager >>>>> Download LINK
>>>>> Download Now
Sso — Wso2 Api Manager And Keycloak Identity Manager >>>>> Download Full
>>>>> Download LINK X8
smm panel
ReplyDeletesmm panel
iş ilanları
instagram takipçi satın al
hirdavatciburada.com
beyazesyateknikservisi.com.tr
servis
tiktok jeton hilesi
pendik vestel klima servisi
ReplyDeletependik bosch klima servisi
tuzla daikin klima servisi
çekmeköy toshiba klima servisi
çekmeköy beko klima servisi
ataşehir beko klima servisi
maltepe lg klima servisi
kadıköy lg klima servisi
maltepe alarko carrier klima servisi
yurtdışı kargo
ReplyDeleteen son çıkan perde modelleri
en son çıkan perde modelleri
lisans satın al
minecraft premium
nft nasıl alınır
özel ambulans
uc satın al