Deploy a Spring Boot Microservice Architecture to Google Cloud and Google Kubernetes Engine
Today, I’ll show you how to deploy a Spring Boot microservice architecture to Google Cloud and Google Kubernetes Engine (GKE). We’ll also create a service mesh and a public gateway with Isito and secure the whole thing using Okta OAuth JWT authentication.
That was a lot of words, let's go into what it all means.
I’m not going to do an in-depth explanation of microservices but to sum it up, microservices are a design pattern that takes larger monolithic services and splits them into smaller “micro’ services. Microservices allow each service to become maintainable, testable, and independently deployable. This architecture works great for big companies with small teams that are responsible for manageable, discrete units of function; instead of having thousands of people monitoring huge monolithic blocks of code.
Kubernetes is a platform for deploying containerized services. You can think of it as a container orchestrator for Docker containers (this is a simplification, but it’ll work). It will allow us to write YAML scripts that automate the deployment of our microservice architecture to our chosen platform, GKE. It’s a huge project with lots to dig into. Take a look at their docs for more info.
Istio adds another layer of features on top of Kubernetes, adding some great monitoring, security, access control, and load balancing features. Check out their website for more info.
The last piece of the microservice architecture is Google Cloud and GKE. This is the platform you’ll be using to deploy the microservice. Another option not covered in this tutorial is Minikube. Minikube runs locally on your computer and might work great for some people; I found Google Kubernetes Engine easier to use and more performant.
We’re going to assume you’re familiar with Spring Boot and Java. If not, take a look at the end of the tutorial for some links to get you started.
Requirements for Spring Boot and Kubernetes
HTTPie: Install HTTPie from their website so that we can run HTTP requests easily from the terminal.
Docker: Please download and install Docker Desktop from their website if you don’t have it already installed.
kubectl: This is Kubernetes’ command line interface. Instructions for installing it are on their website.
Google Cloud: You’ll need a Google Cloud account with billing enabled. A free trial is available and should include more than enough credit and time to get you through this tutorial. Go to the Google Cloud website and sign up.
developer.okta.com: We offer free developer accounts on our developer site. Please sign up for one now. You’ll use it toward the end of the tutorial.
gcloud: This is the Google Cloud CLI. Install it using the instructions from their website. Once that is done, you’ll need to install the
gcloud kubectl components by running the following command:Did I mention microservices have a high initial complexity cost?
Create a Google Kubernetes Engine Project With Istio
You should now have a Google Cloud account with billing enabled. Again, you shouldn’t need to actually spend any money, but without billing, you won’t be able to access the free trial.
Create a new project. Name it
spring-boot-gke (or whatever you want, but you’ll need the project ID for the various commands). Wait for the project to be created.The project name will likely end up with an ID number tacked onto the end, like
spring-boot-gke-232934. You’ll need this project name a few times, so go ahead and store it in a shell variable and take note of it.Once the project is ready, open the project dashboard, open the navigation menu, and click on Kubernetes Engine. Click the Enable Billing button (if you haven’t already enabled billing) and select a billing account.
Click Create Cluster.
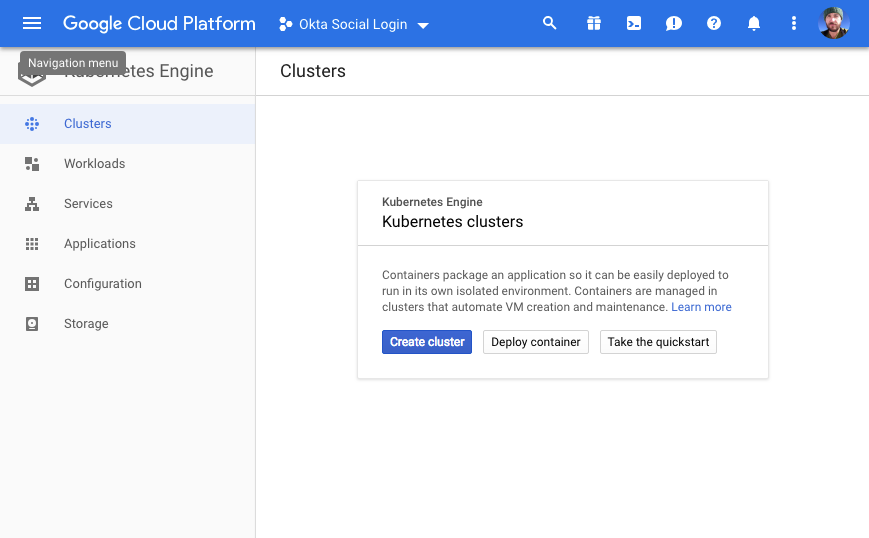
From the left-side panel, select Your First Cluster.
Name the cluster “spring-boot-cluster”.
Select the zone “us-west1-a”.
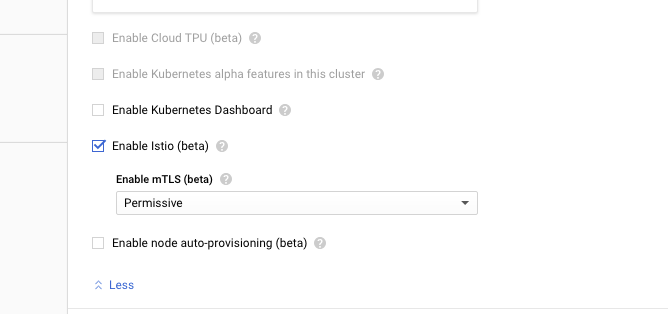
Click on the Advanced Options link at the bottom of the cluster config panel to show the advanced options. Scroll down to the bottom and check the box for Enable Istio (beta). This will automatically install Istio on the cluster.
At the bottom, click Create to create the cluster. Grab a coffee or take a break; it will take a few minutes to create the cluster.
Meanwhile, if you haven’t already, go ahead and initialize the
gcloud CLI by running:During the initialization process, you can set your new project as the default project and the project’s region as your default region.
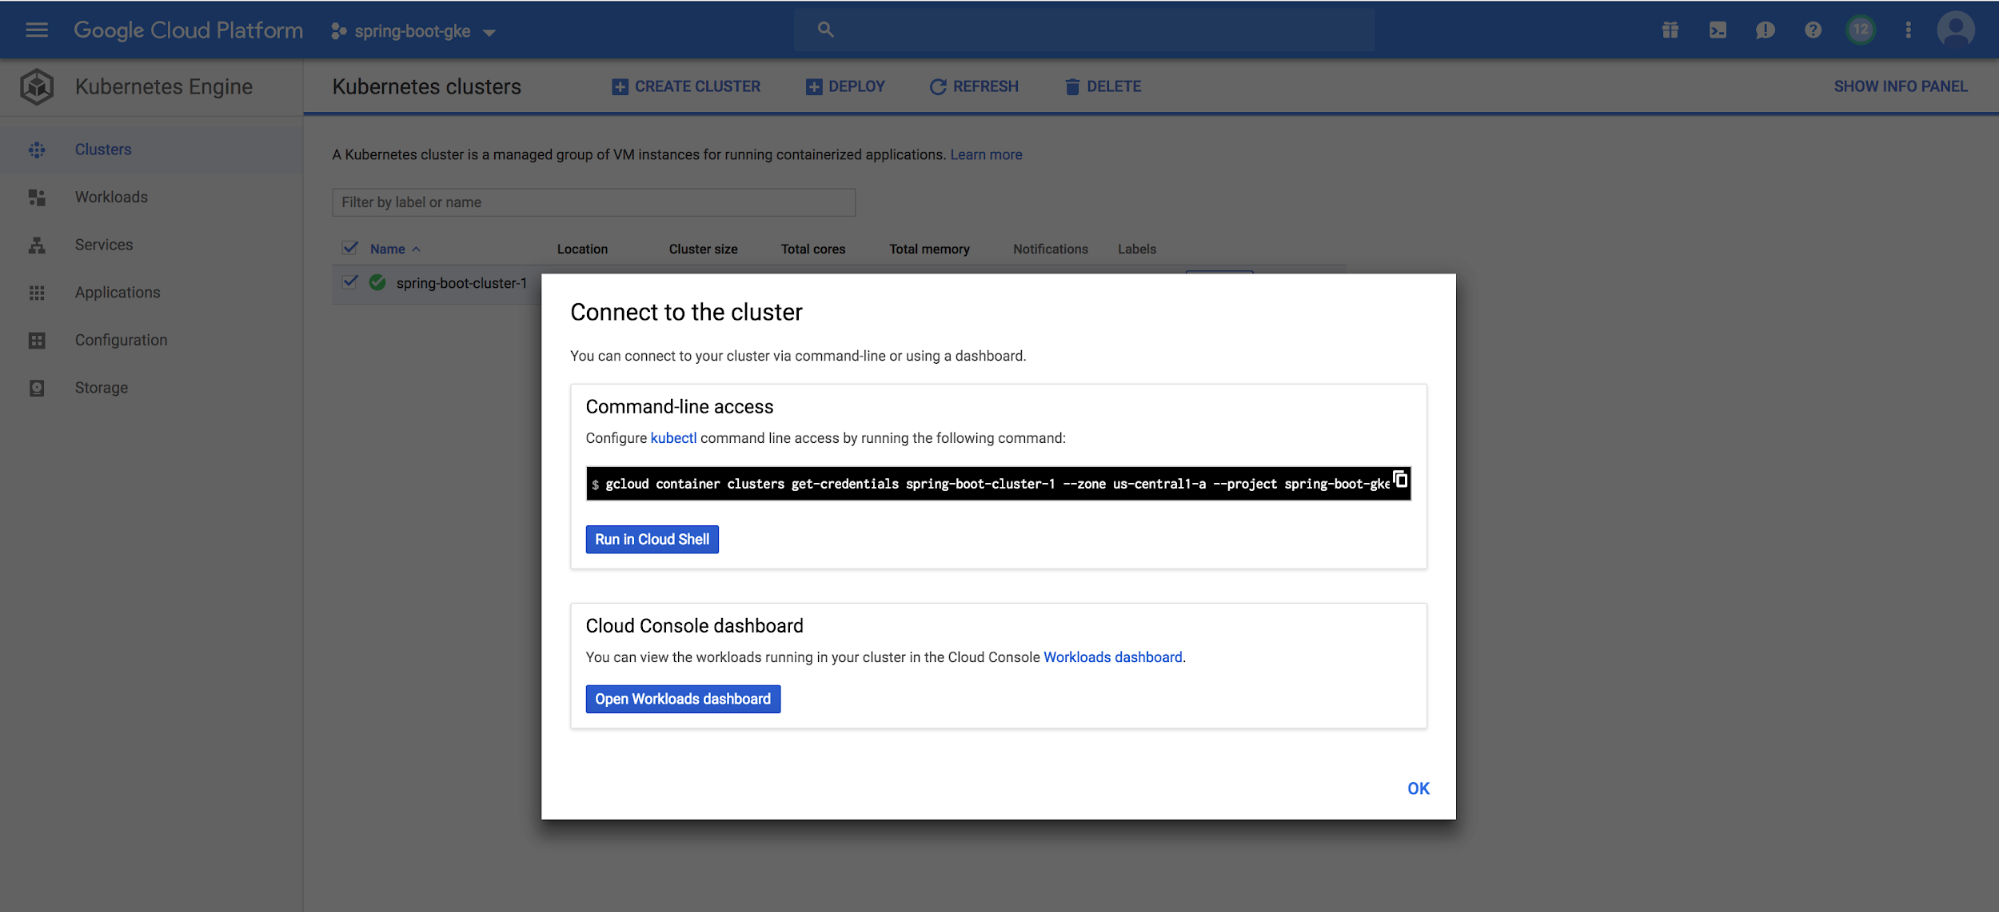
Once the cluster is deployed, you need to connect your local
gcloud and kubectl CLI to it with the following command:If you used a different project name, you’ll need to change the command to reflect that.
NOTE: If you click on the Connect button to the right of the Google Cloud Platform dashboard, you’ll see the correct command to enter:
You should see something like the following as a result:
You will also need to give yourself admin privileges on the cluster:
Now you need to check and make sure the Istio services were installed and are running. There are a couple of ways to check this. First, in your Google Cloud Platform Kubernetes Engine dashboard, click on the Services button. You should see a list of Istio services in your
spring-boot-cluster. They should all have green “Ok” under the status column.While you’re there, note the service named
istio-ingressgateway of type LoadBalancer. This is the public load balancer for your cluster, and the entry shows the public IP and open ports.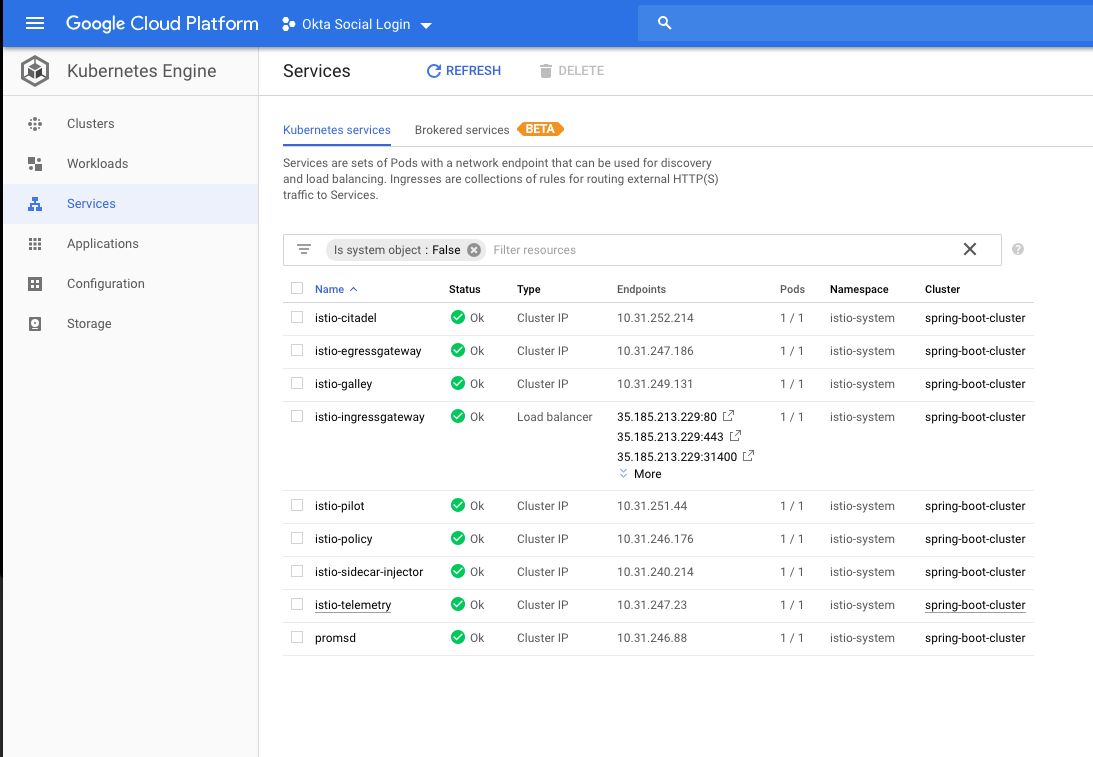
Another way to check is by using the
kubectl CLI.To check the services use the following command:
kubectl get services --all-namespaces. The --all-namespaces is required to show the Istio services, which are in the istio-system namespace.To check the Kubernetes pods, use:
kubectl get pods --all-namespacesThe pods need to all have a status of
Completed or Running. I ran into a problem a couple of times where the auto-configuration didn’t work and some of the pods never reached the Running status and were stuck in ContainerCreating. I had to delete the cluster and reinstall it to get it to work.If this happens you can use the
describe pods command to see what’s going on: kubectl describe pods -n istio-system. This will give you a TON of information on all of the pods in the istio-system namespace, which is specified using the -n options.If you’ve gotten this far without problems, you now have a Kubernetes cluster deployed on GKE with Istio installed! Pretty sweet.
Both Google and Istio have some pretty helpful docs if you have a problem. Check out the Google GKE docs and the Istio GKE docs for further support.
Create a Spring Boot Project for Your Microservices
Now go to the Spring Initializer and create your starter project.
- Change the build tool from Maven to Gradle.
- Use Java and Spring Boot version 2.1.3.
- Update the Group to:
com.okta.spring - Use Artifact:
springbootkbe - Add three Dependencies:
Reactive Web,Reactive MongoDB, andLombok
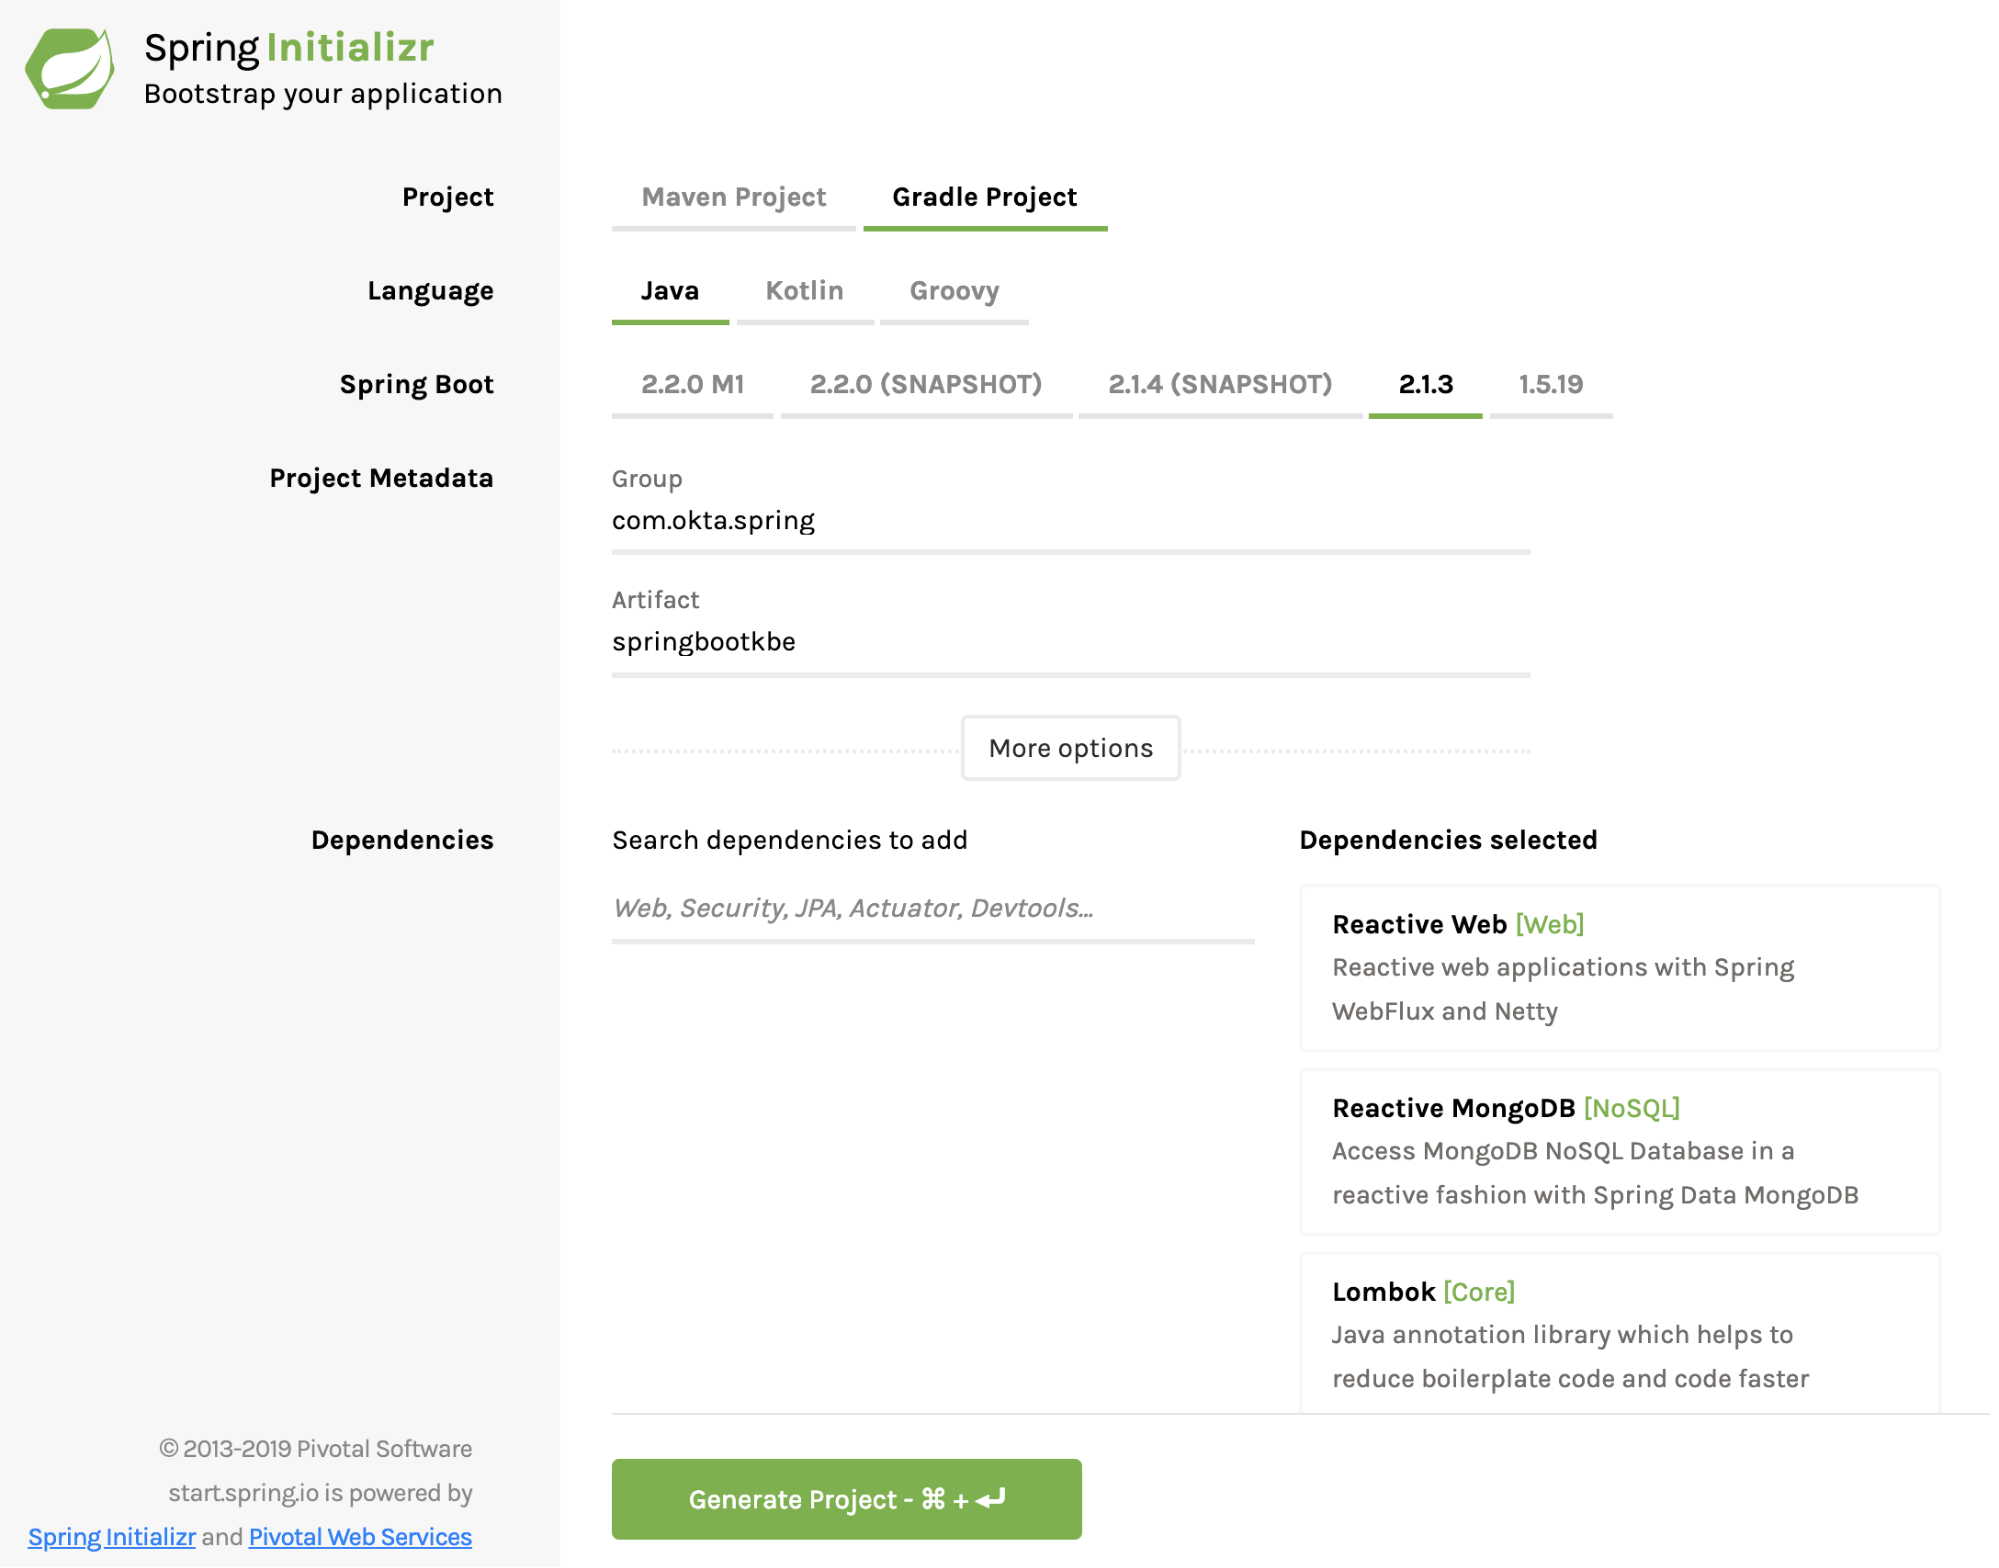
Click Generate Project and download the project. Uncompress the project somewhere on your local computer and open it in your favorite IDE or editor.
The Spring Initializer has created a barebones reactive Webflux project with MongoDB support for you to expand upon.
As in some of my other tutorials, and because I like kayaking, you’re going to build a simple reactive REST service that maintains a database of kayak entries. It’s really just to demonstrate basic CRUD functionality (Create, Read, Update, and Delete) and could be generalized to any type of resource.
In the
com.okta.spring.springbootkbe package under src/main/java, create a document class called Kayak.java and paste the following into it. This is your reactive data model document.Now create another file in the same package called
KayakRepository.java.I’m not going to go into too much detail in this tutorial about what’s going on here. Spring Boot is doing a lot of auto-magicking between these two files to create a fully functional reactive Mongo document.
Next, you need to add a controller to allow access to the Kayak document data model. Create a file called
KayakControllerin the com.okta.spring.springbootkbe package.This controller adds two methods to the
/kayaks endpoint, a POST and GET endpoint that add a new kayak and list all kayaks, respectively.Finally, add a simple root controller called
RootController.This controller is required because Kuberenetes performs health checks on the root endpoint of our services and needs to return a response otherwise the cluster will think your service is down. The actual endpoint is configurable but you can just leave it at the root for now.
To bootstrap in some sample data into our database, update the
SpringbootkbeApplication class definition to match the following.At this point, you have a fully functioning Spring Boot app (minus a MongoDB server). To test your app, add the following dependency to your
build.gradle file.This adds an embedded MongoDB database to your project. You’ll need to remove this dependency before you deploy to the cluster, but it will let you run the Spring Boot app locally.
Run the Spring Boot app using:
gradle bootRun.You should see a bunch of output ending with:
Use HTTPie to test the app:
http :8080 (this runs a get request on the default Spring Boot port).And GET your
/kayaks endpoint using: http :8080/kayaksAssuming that all worked, delete the embedded Mongo dependency. You’re going to be using a Mongo Kubernetes pod and this dependency will cause problems with the cluster deployment.
Deploy the MongoDB Kubernetes Pod for Your Spring Boot App
Kubernetes works (to grossly generalize and simplify) by deploying Docker containers using YAML deployment scripts.
Create a file called
deployment-mongo.yml in your project’s root directory.This defines the MongoDB Kubernetes
Deployment and Service required to create the Mongo database on the cluster. I’m not going to try and fully explain what these objects are here, but you can read the Kubernetes deployment docs and the service docs. Roughly speaking, deployments define the micro-applications that run in the deployed pods while services provide the overarching abstraction that defines the access point to the apps in the pods. This abstraction provides a necessary continuity because pods may be killed and restarted and there may be multiple pods running a single service.Now for some excitement! You’re going to deploy the Mongo database deployment and service to your GKE cluster.
Use the following command:
You should see:
Check on the pod by running:
You should see:
If the status is listed as
ContainerCreating, wait a moment and run the command again. If it gets stuck on ContainerCreating for more than a few minutes, likely something has gone wrong. You can use the kubectl describe pods and kubectl get events commands to get an idea of what’s happening.This configured a Mongo database running on port 27017 using the standard docker image
mongo:3.6.6.Pretty great, huh? Next stop, rocket science!
Deploy the Spring Boot App to the Cluster
Add a file called
Dockerfile in the root directory:Update the
src/main/resources/application.properties:This configures your Spring Boot port to the port you’re exposing in the
Dockerfile as well as configuring the MongoDB host and port. The host by default will be the name of the service inside the cluster.Build your app again (you did remove the
flapdoodle dependency, right?):Create another Kubernetes deployment script called
deployment.yml in the root project directory:NOTE: Take a close look at the line with
gcr.io/spring-boot-gke/kayak-app:1.0. That middle part there is the Google Cloud project name. This needs to match the project name you used along with the assigned ID number (something like spring-boot-gke-43234).gcr.io specifies a Google Cloud host for the docker image in the United States. It’s possible to specify other locations. See the Google Container Registry docs for more info.A brief summary of what’s about to happen, as there are a lot of moving parts. The Spring Boot app is going to be Docker-ized: built into a Docker image. When you run the deployment script on your cluster, it’s going to try to pull this image from the Google Container registry. Therefore you need to push the image to the container registry and tag it so that Kubernetes can find the correct image.
If you’re using a local Docker Desktop, go ahead and start it and wait for it to start.
Before you do anything, you will need to configure Google Cloud and docker to play nicely together:
Build the Docker image:
Tag the image and push it to the Google container registry (again note the Google Cloud project name):
Now apply the
deployment.yml file to the GKE cluster:Check to make sure the pod deployed properly:
At this point, however, your cluster isn’t quite ready. It’s not publicly accessible.
Create a file called
istio-gateway.ymlAnd apply it:
You should get:
Test the Deployed Google Kubernetes Engine and Spring Boot App
Now that you have successfully deployed the Spring Boot app to the Google Kubernetes cluster and created the gateway linking your service to the outside world, you’ll want to test the endpoint.
There are some good docs on the Istio website about ingress traffic that have a lot of good information. Below, copied from that page, are some commands that will determine the public-facing host/ip address and ports and save them into shell variables.
In your configuration,
INGRESS_PORT will likely just be the default 80 for HTTP (no SSL).Run the following command to see the host and ports:
The public IP address can also be found by looking at the load balancer IP address in the Cloud Platform Dashboard -> Kubernetes Engine -> Services. Look for istio-ingressgateway service of type LoadBalancer.
Test the app!
You should see:
And hit the
/kayaks endpointYou should see:
Welcome to the world of microservices!
There’s obviously a ton more that can be done with GKE and Istio. In practice, microservices typically manage a large mesh of services and deployed pods that can be scaled up and down as needed, and complex security architectures can be managed between the different pieces and with the outside world. This tutorial won’t get into more of that, but there is one more step left: adding JSON web token authentication with Okta.
Create an OpenID Connect App on Okta
Log into your developer.okta.com account (you did sign up for one of their free developer accounts, right? If not sign up here).
Click on the Application top menu, then the Add Application button.
Choose application type Web.

Click Next.
Give the app a name. I named mine “Spring Boot GKE”.
Under Login redirect URIs add
https://oidcdebugger.com/debug.Toward the bottom, under Grant type allowed, check the Implicit (hybrid) box.

Click Done.
Leave the page open and take note of the Client ID and Client Secret. You’ll need them in a minute when you use the OIDC Debugger to generate a JSON web token.
Update Your Spring Boot Microservices for OAuth 2.0
Add the following dependencies to your
build.gradle:You also need to add the following to your
src/main/resources/application.properties file (filling in your own Oktadeveloper URL, something like dev-123456.okta.com):This tells Spring where it needs to go to authenticate the JSON web token (JWT) that you’re going to generate in a moment.
Finally, you need to add a new Java class called
SecurityConfiguration.java:This file configures the project to allow all transactions on the root endpoint but to authorize all other transactions.
Build a New Docker Image and Push to the GKE Cluster
Now that you have a new, auth-enabled Spring Boot app, you need to build it, package it in a Docker container, push it to the Google Cloud Docker registry, and apply a new deployment to your Kubernetes cluster.
Go to the project root directory from your shell.
Build the Spring Boot app with the authentication updates:
Build the new Docker image. Notice the new image name (it includes
-auth). Also: make sure your Docker Desktop is running.Tag and push your Docker image to the Google Cloud container registry. Change the project name in the repo path, if necessary.
Delete the deployed pod on the cluster:
Update the
deployment.yml file to reflect the new image name (line 28 in the file):Re-deploy the updated Kubernetes deployment:
Use
kubectl get pods to check the status of the pod. It will take a few seconds to fully update. Once it’s ready, test the /endpoint.And the
/kayaks endpoint, which should be protected:So close! The last thing you need to do is to use the OIDC Debugger tool to generate a token and test the JWT authentication.
Generate a JWT and Test OAuth 2.0
Go to the OIDC Debugger. You’ll need your Client ID from your Okta OIDC application.
- Fill in the Authorize URI:
https://okta.okta.com/oauth2/default/v1/authorize - Fill in the Client ID.
- Put
abcdeffor the state. - At the bottom, click Send Request.
Copy the generated token, and store it in a shell variable for convenience:
Run the GET on the
/kayaks endpoint again, this time with the token:NOTE the double quotes! Single quotes won’t work because the variable won’t be expanded in the string.
You should get:
Move Forward With Spring Boot Microservices and Kubernetes
That’s it! You’ve covered a ton of ground here. You created a Kubernetes Cluster with Istio using Google Kubernetes on Google Cloud. You configured your local system to interact with the cluster using
gcloud and kubectl. You created a Spring Boot app that used a MongoDB backend, Dockerized it, pushed it to the Google Cloud registry, and deployed it to your cluster. You also added OIDC authentication to the app.You can find the source code for this example on GitHub at oktadeveloper/okta-spring-boot-microservice-kubernetes.
If you’re into microservices and Spring Boot, you might like these posts too:
- Build Spring Microservices and Dockerize Them for Production
- Secure Service-to-Service Spring Microservices with HTTPS and OAuth 2.0
- Build and Secure Microservices with Spring Boot 2.0 and OAuth 2.0
If you have any questions about this post, please add a comment below. For more awesome content, follow @oktadev on Twitter, like us on Facebook, or subscribe to our YouTube channel.
Build a Microservice Architecture with Spring Boot and Kubernetes was originally published on the Okta Developer blog on April 1, 2019.


Comments
Post a Comment
Please Share Your Views